How to use SVN (Subversion) on Google Code hosting

Google has generously offered free hosting services for free open source developers to host their projects either by using Mercurial, Subversion or git.

This blog post touches on the basic on to use SVN to maintain source code repository on Google Code Hosting.

Assumptions
This tutorial assume that you have :

  • Created an open source project on Google Code
  • Installed subversion on your GNU/Linux operating system
  • Have source code to import

Initial Import
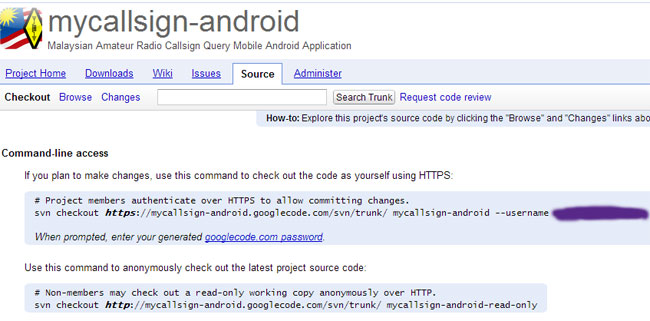
You must perform initial check-in in order to use the SVN repository. To do that, you must go to your Google Code project, as shown in the screenshot.

subversion svn

From bash terminal, to import your project into Google Code, type:

svn import /path-to/src/ https://your-project-name.googlecode.com/svn/trunk/ --username example@gmail.com -m "initial import"

You'll be prompted to enter googlecode.com password, which you can generate from your Google project page

SVN commit
After initial import, your source code will be made available from Google Code hosting for public access.

You may 'commit' after you've made revision or alteration into the source code. to "commit" type:
[bash]
svn commit -m "added new TextField to user-interface"
[/bash]

the -m specifies change log, you shouldn't commit without a proper log message as this will help other users to track the changes that you've made with your source code.

SVN add: For adding new source files
If you add new files to your source code, just type:
[bash]
svn add <filename>
[/bash]

You may then proceed with "svn commit" to add the file to the repository server.

Recursively add unversioned files into SVN repository
If you've added several new files into source code working copy, these file will be unversioned and thus won't be committed to the subversion server.

You can use this command recursively add new unversioned files to svn repository.

[bash]

svn status | perl -ne 's/^\?\s+(\S.+)$/\1/g;chomp;system("svn add \"$_\"");'

[/bash]

**taken from http://www.amiryan.org/2009/04/22/howto-recursively-add-unversioned-files-into-svn-repository/

Generate EAN,UPC,ISBN barcodes in Ubuntu / Debian Linux

barcode‘ is a utility in Debian GNU/Linux distribution used for generating common 1-D barcode: EAN-13, EAN-8, UPC, ISBN, code93, code128 & codabar.
barcode outputs file in postscript format which can be converted to PDF with the ‘ps2pdf‘ utility

Usage:

1. Outputs isbn barcode and converts it to PDF file

$  barcode -o barcode.ps -e isbn
$  ps2pdf barcode.ps

2. Outputs EAN-13 barcode

$ barcode -o barcode-ean.ps -e ean

If you are looking for a tool that could generate QR Code, then you can try ‘qrencode

Solving SSH “channel 3: open failed: administratively prohibited” error when tunnelling

A couple of days ago, I’ve encountered this error when I was trying to create a SSH tunnel from my office LAN to a remote server.

After looking for a solution, I found out that the remote SSH server must add “PermitTunnel yes” line in “/etc/ssh/sshd_config” file.

To do that, you need to:

sudo echo "PermitTunnel yes" >> /etc/ssh/sshd_config
service sshd restart

The second line is used to restart the ssh service in order to enable the changes.

How to send Email with SMTP using Telnet in GNU/Linux

SMTP is a protocol to send email over the internet and it is documented in RFC821. Sending email using Telnet is straight-forward if you know how to do it.

telnet smtp.example.com 25
MAIL FROM: <example_from @ example.com>
RCPT TO: <example_to @ example.com>
DATA
From: [John Doe] <example_from @ example.com>
To: [Jane Doe] <example_to @ example.com>
Subject: This is a test message....

This is an example email content to demonstrate email sending using Telnet.

.

QUIT
[/pre]

Note that you need to type "." and QUIT after you've finished writing the email content. You should change the SMTP server domain and the email used in the example accordingly.


Backup your Gmail account in Ubuntu Linux with gmvault

This is a follow-up of my previous post “What to do when your Google disabled your Gmail account?“.

Here’s how to download all emails from your GMail account with Gmvault:

Download and setting up gmvault

1. First you need to install python-pip
[bash]
sudo apt-get install python-pip
[/bash]

2. Then using ‘pip’, install gmvault
[bash]
sudo pip install gmvault
[/bash]

3. Finally you can sync and backup GMail accounts with ‘gmvault
[bash]
gmvault sync your_username @ gmail.com
[/bash]

4. gmvault will ask you to authenticate yourselves with GMail, and after that, the syncronization process starts. gmvault stores all the gmail backup in the ‘gmvault-db‘ directory.

p/s: Some users encounters error telling that the “All Mail folder is not visible”. You can enable All Mail folder visibility by checking the “Show in IMAP” box in Settings->Labels. Also, IMAP access should also be enabled for this to work.

p/s 2: It might not be obvious right now why you need to backup your emails when Gmail has gigabytes of storage. But according to Gmail discussions group, Google can and might disable access to all of its services, locking the users out from their emails forever.

How to mount exFAT (used in SDcard / USB Drive) filesystem in Ubuntu

exFAT is a filesystem developed by Microsoft for use in flash drives or portable storage devices where the use of NTFS is not feasible. exFAT is inteded to be supported on consumer devices such as MP3 players, cameras, mobile phones and video recorders.

However filesystem formatted with exFAT are not currently supported by Ubuntu (as of 12.04) out from the box. In order to do that, you need to download exFAT filesystem module from relan PPA.

1. Add exFAT PPA repository

[bash]
sudo -s
apt-add-repository ppa:relan/exfat
[/bash]

2. Update apt-get repository
[bash]
apt-get update
[/bash]

3. Install exfat modules
[bash]
apt-get install fuse-exfat
[/bash]

That’s it you’re done! Then you can finally mounts exFAT filesystem using the following command….

4. mounting exFAT filesystem
[bash][/bash]
mount -t exfat /dev/sdd /media
[bash][/bash]

You should be able to mount exFAT filesystem from now on… the fuse-exfat also comes with ‘exfat-utils‘ package which enables the creation, checking and labelling exFAT filesystem.