How to Optimize and speed up PHP with OPCache

PHP 5.5 and 5.6 comes with OPCache. OPCache speeds up PHP execution by storing precompile bytecode of PHP in shared memory. Taking advantage of fast memory operations compared to hard disk operation, OPCache eliminates the process of having to read PHP scripts from the disk each time whenever a script must be executed.

In short, OPCache saves the time needed to serve PHP-powered websites!

How to enable OPCache?
This tutorial is written from Ubuntu 14.04 LTS standpoint – using php5-fpm, but it should also work for other Linux distro.

  1. First edit ‘/etc/php5/fpm/php.ini‘ file.
  2. Find “opcache” section in the PHP ini.
  3. Uncomment and change opcache.enable to opcache.enable=1
  4. Do the same for >opcache.memory_consumption, changed its value from 64 to 128 (or 256)
  5. Change opcache.interned_strings_buffer from 4 to 16
  6. Changed the opcache.max_accelerated_files to 8192

Activate OPCache with php5enmod command.

sudo php5enmod opcache

Save file and restart php5-fpm.

sudo service php5-fpm restart

PHP OPCache should be running on your server now. Here’s a reference of /etc/php/fpm/php.ini file in Ubuntu 14.04 LTS.

[opcache]
; Determines if Zend OPCache is enabled
opcache.enable=1

; Determines if Zend OPCache is enabled for the CLI version of PHP
opcache.enable_cli=0

; The OPcache shared memory storage size.
opcache.memory_consumption=128

; The amount of memory for interned strings in Mbytes.
opcache.interned_strings_buffer=16

; The maximum number of keys (scripts) in the OPcache hash table.
; Only numbers between 200 and 100000 are allowed.
opcache.max_accelerated_files=8192

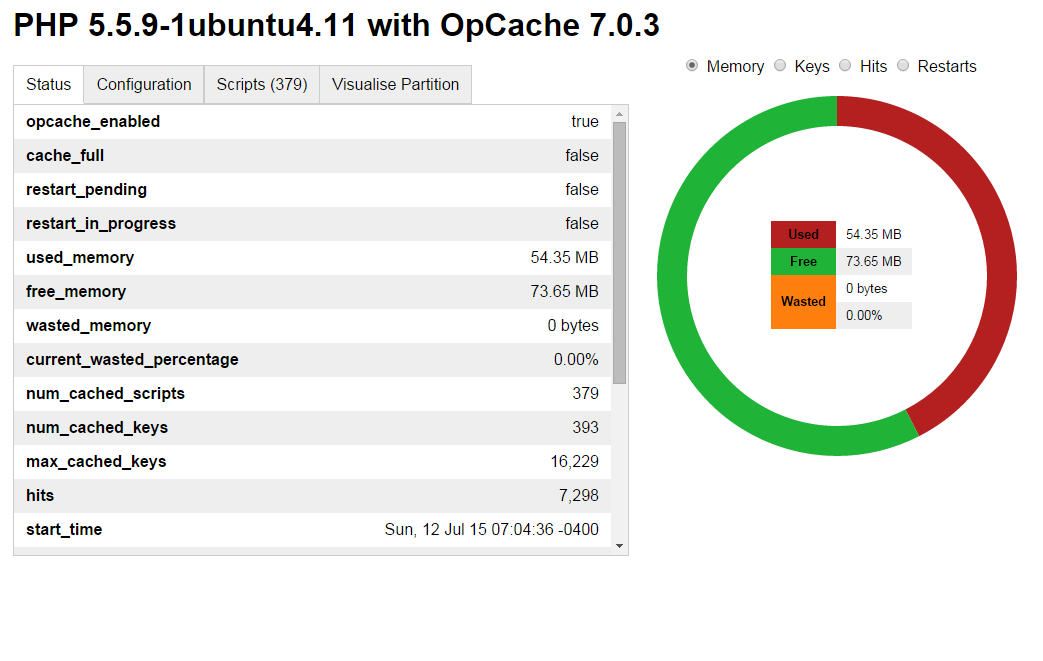
BONUS: How to verify whether PHP OPCache is running ??
You can verify whether OPCache is running by using opcache-status by Rasmus Lerdorf. Just drop the script in one of your web directory and browse. If you’re not a Git fan, I’ve also have taken the liberty of mirroring the download: opcache-status.zip

opcache-status screenshot
opcache-status-ss

Stop Comment spams with IP Blacklist Cloud

Comment spams is the bane of any website operator that rely on real human interaction. Stopping comment spams by hand is a tedious process especially when comment spam attacks are sophisticated and are launched from Botnet. There are several techniques that can be employed to fight comment spams including behavioral analysis and also IP analysis.

In maintaining WordPress and Joomla sites, I myself has analyzed several web logfiles and Cloudflare logs to learn that most comment spam originated from certain ip blocks and countries. Therefore, I decided to completely deny access from those affected ip block through firewall (which keep the comment spam low and saves web server resources!)

ipblc_server

However, recently I found a new service IP Blacklist Cloud which list the top most blacklisted ip address through collaborative effort. Normally I find blacklisting by ip address is tedious and probably harmful to legitimate visitors, however after conforming the ip addresses that I found inside my spam logs, I decided the list is legitimate and decided to firewall-block some of the worst offenders in the list.

IP Blacklist Cloud free WordPress plugins, which I personally does not use due to my policy of keeping my installation lean with minimal (to no plugins!), however I see that there’s no harm giving a shot!

How to check if your website supports SPDY 3.1

Although Google has announce to drop SPDY support by early February 2016 in favor of HTTP/2, SPDY remains the best HTTP protocol extension to maximize compression and reduce webpage load latency.

The current and final SPDY implementation supported by Mozilla Firefox and Google Chrome is SPDY/3.1.

In order to check if your webserver supports SPDY 3.1, just simply:

  1. Go to your website, eg: https://blog.mypapit.net/
  2. Using Chrome, type – “chrome://net-internals/#spdy” at the addressbar
  3. You should see your website name and spdy/3.1 protocol listed, refer to Screenshot below

spdy

Additionally, you could go to spdycheck.org to check if your web server supports SPDY.

Have fun!

Tips for Securing SSH in Linux Box (Securing SSH Series)

Secured Shell or SSH is a great way to enable a secure login for your UNIX / Linux Box. However there are precaution that you should take in order to properly secure SSH daemon from being scanned or attacked by script kiddies or automated bots.

This week I’m going to write a series of article on securing SSH on Ubuntu Linux Box (VPS) and I’m going to link to this post from time to time.

  1. Disable Root login, enable SSH login for a handful of users only
  2. Install and configure Fail2Ban
  3. Limit access with Firewall Rules (limit by ip block, or ip address)
  4. Limit connection rate to SSH port
  5. Disable keyboard interactive login, Use public-key login
  6. Security Security through obscurity: Hiding SSH version
  7. Security Security through obscurity: Change default SSH ports

Hope this will help in securing your Linux Box / Linux VPS

How to remove Amazon Shopping search result from Unity

Hi there, Ubuntu 12.10 Quantal Quetzal is out! However the Dash search functionality includes shopping results retrieved from the internet (namely Amazon), which I personally found annoying.

ubuntu

In order to remove that, just run this command:

[bash]
sudo apt-get remove unity-lens-shopping
[/bash]

This will remove online shopping search suggestions. Your mile may vary, but from my point of view, it does speed-up search result.

Try it!