How to save (or mirror) an entire website with httrack in Debian and Ubuntu

Httrack is a tool for copying and saving an entire website in Debian and Ubuntu. Httrack can crawl an online website save each of the pages (including graphic and other downloadable files).

Among httrack features are:

  • Able to continue interrupted downloads
  • Selective download
  • Customizable user-agent
  • Customizable Scan-rules, can exclude files from being crawled
  • Accept cookies
  • URL hacks
  • Tolerant requests support
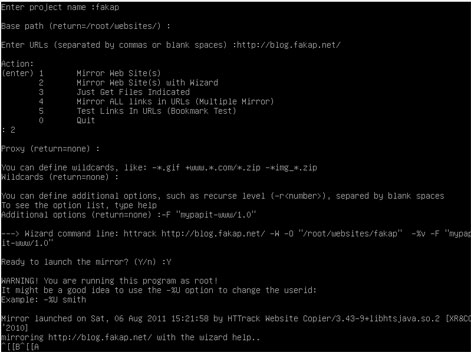
httrack screenshot

Using ‘httrack‘ is easy, as it has built-in wizard that can guide you through the process of mirroring web sites. The user will be asked a series of question about the URL to be mirrored, the location where the files will be saved, proxy server and the user-agent to be used.

p/s: httrack perhaps is the only open-source website copier/downloader tool available for GNU/Linux operating system. It is efficient and easy to use. The only gripe that I’ve when using ‘httrack‘ is that it does not provide progress feedback (unlike its counterpart in Microsoft Windows) like ‘wget

How to add contrib and non-free repository in Debian GNU/Linux

Debian GNU/Linux is probably the only Linux distro that has the largest software repository. However the default installation for Debian only includes the ‘main’ repository which is directly maintained by the Debian community and fulfills the Debian Free Software Guidelines (DFSG).

The two other repositories ‘contrib’ and ‘non-free’ are not enabled by default as it contains software that either does not meet DFSG requirements or depends on library or packages which does not meet DFSG requiments.

How to enable contrib and non-free repo in Debian
As ‘root’ you need to edit /etc/apt/sources.lst

Then add ‘contrib’ and ‘non free’ at the end of each line that begins with “deb” and “deb-src” just like the example:


deb http://http.us.debian.org/debian jessie main contrib non-free

deb http://security.debian.org jessie/updates main contrib non-free

Save the file, and run ‘apt-get update‘ and optionally ‘apt-get upgrade‘ to activate the changes.

Recommended Reading

Linux Package Manager Cheat Sheet Reference Chart

Linux comes in many flavors or distros, and each distro handles software installation differently from one another. Most GNU/Linux distro uses a package management system to manage software updates/instalation/removal in order to help users administer their Linux systems.

However, many of these package management system has different interface and commands, as such users from Ubuntu (or Debian based) might only be familiar with ‘apt’ or dpkg while Fedora (Red Hat based) users might only familiar with yum and rpm, which may create confusion when users from either distro were to exchange environments.

Luckily, somebody was kind enough to provide these users with Linux Package Manager Cheat Sheet which act as a reference point whenever a user had to switch to another distro which uses package management that are not familiar with them.

The package management software listed are for: apt,dpkg,yum, rpm, pkg* (slackware based) and AIX-based lsl**.

[ Source ]

How to change hostname in Ubuntu server

Here’s how you can change hostname in Ubuntu server

1. Edit /etc/hostname, and change the hostname
2. Edit /etc/hosts file, and add the hostname to 127.0.0.1, or to any local machine ip
3. run, “sudo server hostname stop”, and “sudo server hostname start”

How to Secure SSH server from Brute-Force and DDOS with Fail2ban ( Ubuntu )

Fail2ban is a security tool used for preventing brute-force attack and Distributed Denial of Service (DDoS) attack to your GNU/Linux box.

Fail2ban monitors failed login attempts and subsequently blocks the ip address from further logins. Although Fail2ban can also be used to secure other services in Ubuntu server, in this post, I will only focus on securing SSH server.

Step 1: Install Fail2ban and (optionally) sendmail

sudo apt-get install fail2ban
sudo apt-get install sendmail-bin

Step 2: Setting up Fail2ban

Next, you need to configure fail2ban by creating a copy of ‘jail.conf’ to ‘jail.local’

cd /etc/fail2ban
sudo cp jail.conf jail.local

Step 3: General fail2ban configuration

Edit fail2ban configuration file using your favorite text-edito (I personally use ‘nano’)

sudo nano /etc/jail.local

You can set IP address for fail2ban to ignore, IP addresses can be separated by space.

Bantime is the duration of time that you want fail2ban to block suspicious attempt, the value is in seconds
Maxretry is the number of failed attempts before fail2ban block the IP-address, in this case 3600 means 1-hour ban

# "ignoreip" can be an IP address, a CIDR mask or a DNS host
ignoreip = 127.0.0.1 192.168.1.1
bantime  = 3600
maxretry = 3 

Step 4: Enabling ssh and ssh-ddos protection
Find ssh configuration under [ssh] heading, and enable it.

[ssh]
enabled = true
port    = ssh
filter  = sshd
logpath  = /var/log/auth.log
maxretry = 3 

Similarly, you can also enable [ssh-dos] protection by changing the enabled value to “enabled = true

[ssh-ddos]
enabled = true
port    = ssh
filter  = sshd-ddos
logpath  = /var/log/auth.log
maxretry = 2

Step 5: Enable Sending Notification Email (optional)
Optionally you can have fail2ban sends you notification email in case of suspicious login detected. To do that, you need to locate destemail settings and changed it to your email

destemail = security@mypapit.net

Fail2ban can use ‘sendmail’ and ‘mail’ application to send notification email

Step 6: (Re-)start Fail2ban
After all is done, you may save the file, and (re)start the fail2ban service

sudo /etc/init.d/fail2ban restart

You can test the configuration by trying to login into your box. You may also check fail2ban log in /var/logs/auth.log (or in other directory specified in jail.local)

For more information about fail2ban, you can read : the official fail2ban manual

Recommended Reading

Debian Squeeze 6.0.2 update (Security – important)

Debian project has released update on Debian 6.0 (Squeeze) which addressed several security issues and bugfix. Debian Squeeze users are advised to update their installation using “apt-get update” and “apt-get upgrade” command to ensure all of the updates are installed properly.

p/s: Although I currently use Ubuntu, I was actually a Debian user and I continue to use Debian on my VPS to host this website till this very day. Without Debian, I would never has discovered thousands of wonderful open source software in it vast software repositories :)