How to setup OpenDNS using Ubuntu

opendns.gif

Here’s is the step to setup OpenDNS for your Ubuntu desktop :

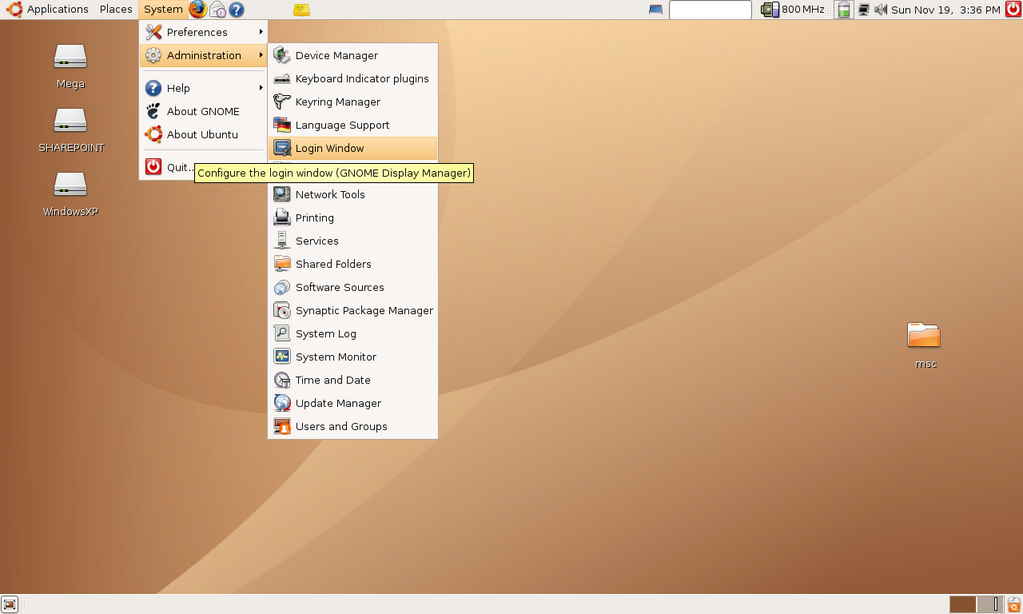
  • From Desktop, goto System and Administration
  • Select Networking, a dialog will appear
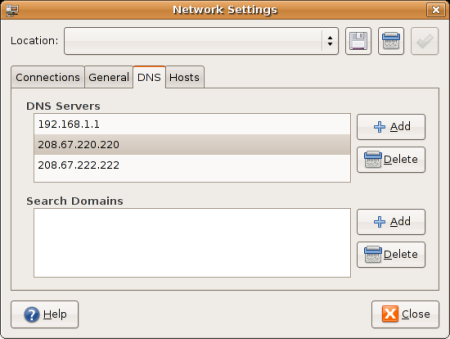
  • Select DNS tab
  • Click Add and put the OpenDNS ipaddress
  • Click close and you’re done!

Here’s the screenshot of the dialog


What is OpenDNS ?

OpenDNS is a free DNS resolution service provided as an alternative to to using your Internet service provider’s DNS servers. One of the advantage using OpenDNS is its intercepts phishing attempts, when a user tries to visit a phishing site. The list of phishing website is constantly updated from Phishtank which is also run by OpenDNS.

I personally use OpenDNS when my ISP DNS service seems to fail at times, though some people speculate that OpenDNS resolution might be slow compared to my ISP’s, but personally, I hardly notice any delays at all. Read about OpenDNS at its website or from wikipedia entry.
[tags]opendns,ubuntu,dns.linux[/tags]

Photorec – Recover files from corrupted Hard Disk (filesystem) with Linux

Today I want to introduce you to Photorec, one of the open source data recovery software available in Linux. Photorec was designed to recover lost files including video, documents and archives from Hard Disks,CDRom and lost photos from Digital camera memory card.

Originally written to recover lost pictures (hence the name), PhotoRec now supports recovering more than 80 files types including zip, bz2, rar, 7z tar, microsoft office files (*.doc,*.ppt, *.xls), jpg, pdf, html, midi,mp3,wav and many more.

PhotoRec ignores filesystems and read raw data directly from block devices, this makes Photorec works well with various filesystem including fat32,fat16,HFS+, NTFS, ext2/3.

PhotoRec is known to not work very well with ReiserFS however.

Here’s the screenshot of PhotoRec in action (which i uses it to test my corrupted MMC) :

From the screenshot, you can see that PhotoRec is able to recover 263 files from my MMC.

PhotoRec is safe to use, it will never attempt to write to the drive or memory support you are about to recover lost data from. All recovered file is stored in your /home directory and not withing the recovered disk itself, thus preserving the data contained within it.

For ubuntu users, you may find PhotoRec listed under the ‘testdisk’ package in Universe repository.

You can find out more about PhotoRec and testdisk at : http://www.cgsecurity.org/wiki/PhotoRec

[tags]data recovery,linux,ubuntu,recovery,hard disk data recovery,data-recovery,photorec[/tags]

Howto Bypass Ubuntu Login Screen

I think many of you who has installed Ubuntu, must hava encountered a login screen before you actually can use the Ubuntu desktop.

It maybe not a big deal for those who don’t mind having to login first before using the operating system because of security reasons or if the pc is shared between multiple users.

But some might find it inconvenience if they had to login each time after booting to use their operating system. However there’s a way to enable automatic login to your desktop and completely bypass the login screen.

Here’s how to do it :

  1. First go to System,Administration. Select Login Window
  2. A dialog will appear, Select Security Tab
  3. Check Enable Automatic Login, then select the name of the default user
  4. You’re done, the next time your Ubuntu boots, you will be automatically be logged in as the default user.

This setup is ideal if you’re not sharing the computer with anybody else and the default users selected is not listed as one of the sudoers.

It is also convenience if you want to allow people to automatically log on into your pc as a ‘guest’ users without administrator privileges.
[tags]ubuntu,dapper,edgy eft,gnome,debian,linux[/tags]

hacking dict.org with ubuntu linux

I got bored one day and decided to try out some of the functionalities offered by the dict.org server. Dict is dictionary server protocol designed to give access to definitions from a set of natural language dictionary databases.

Here’s how I access dict.org server using only ‘telnet’ application available on my Ubuntu desktop.

  • Launch a terminal app, telnet to dict.org port 2628
  • List all available dictionaries by typing “show db”
  • Get definitions of word using, “define [dictionary] word” (define wn boring)
  • In this case i choose ‘boring’, since I’m pretty bored at this time to do this stuffs
  • For more dict commands, please refer to RFC 2229

Screenshot dict on Linux

A friendly dict client (named “Dictionary Lookup‘) is included as a panel applet in Ubuntu. You can easily lookup word definitions from your desktop panel :

And with the information on the RFC 2229, i’m there’s a lot more of dict clients out there, that might suit your needs.
[tags]ubuntu,debian,dict,dictionary,rfc[/tags]


Howto Upgrade Ubuntu Dapper to Edgy Eft

If you already have Ubuntu Dapper 6.06 LTS installed, and you’re kinda lazy to perfom a fresh installation of Ubuntu Edgy Eft, you can perform distribution upgrade from your Dapper Drake installations to Edgy Eft.

Here’s a quick way to do it :

Goto terminal ( From Desktop, goto Applications->Accessories->Terminal )

user@desktop:~$ sudo sed -e 's/dapper/ edgy/g'
-i /etc/apt/sources.list
user@desktop:~$ sudo apt-get update
user@desktop:~$ sudo apt-get dist-upgrade

Then lay back while your distro upgrades itself.

Note: My X won’t start after upgrading from Xubuntu Dapper to it’s Edgy Eft counterpart. I fix it by doing “sudo apt-get install xubuntu-desktop”.

Updates (from Xubuntu website):

Xubuntu 6.10 has not yet officially been released, but you can already download the final stable .iso image here. Be aware though, that there may be some problems upgrading from the Dapper Drake version when using update-manager.
Similarly, if you use the default Ubuntu installation with GNOME, you may want to use “apt-get install ubuntu-desktop” *IF* your X won’t start after upgrading (might not affect you, btw).

Happy upgrading!

(thanks to johnny)

[tags]ubuntu,dapper,edgy eft, linux, debian, opensource, open source, gnu/linux[/tags]

Linux Command by Examples

Today I want to introduce you to another excellent website from a bunch of nice people that I know, Linux by Examples. Unlike other GNU/Linux related site, this blog teaches you on how to use common Linux command by giving simple, practical example that are easy to follow.

The GNU/Linux commands are also grouped by categories according its functionalities such as :

  • Administration
  • Archive
  • Developer
  • Network
  • Text Manipulation

and other common commands.

The examples presented in the blog itself are easy and simple to follow, and is accompanied by step-by-step explanations from writer.

I suggest that you have a look at Linux By Examples website and bookmark it for future reference, because it can be a handy in the future :)

[tags]linux,tutorial,guides,example, command-line, linux howto, howto[/tags]