How to install Unity 6.x backports to Ubuntu 12.04 LTS (Precise)

Unity 6.x (included by default in Ubuntu 12.10 Quantal) features performance improvements and new features on the Unity 3D user-interface as several bug fixes which enhances user experience while using Ubuntu desktop. Besides that, the backport also improve the performance of low-end 3d cards when rendering unity animations.

ubuntu logo 12.10 Quantal

Use these command to install Unity 6.x backports into Ubuntu 12.04 LTS:
[bash]
sudo add-apt-repository ppa:benkai/precise-unity-backport
sudo apt-get update
sudo aptitude remove unity-lens-applications
sudo aptitude install unity
wget http://ppa.launchpad.net/benkai/precise-unity-backport/ubuntu/pool/main/u/unity-lens-applications/unity-lens-applications_6.4.0-0ubuntu2_amd64.deb or
wget http://ppa.launchpad.net/benkai/precise-unity-backport/ubuntu/pool/main/u/unity-lens-applications/unity-lens-applications_6.4.0-0ubuntu2_i386.deb
sudo dpkg -i unity-lens-applications_6.4.0-0ubuntu2_*.deb
[/bash]

Note:
The unity backport may cause stability issues with Nouveau (nVidia Accelerated Open Source video driver). Those who are using nVidia cards are advised to use nVidia blob binary drivers.

Ubuntu 12.10 Performance Comparison : 64-bit vs 32-bit

It has been known that the X86 64bit architecture outperform 32bit architecture. However, little is known whether 64-bit Ubuntu installation outperforms its 32-bit counterpart significantly as the latter is marked as recommended download from Ubuntu website.

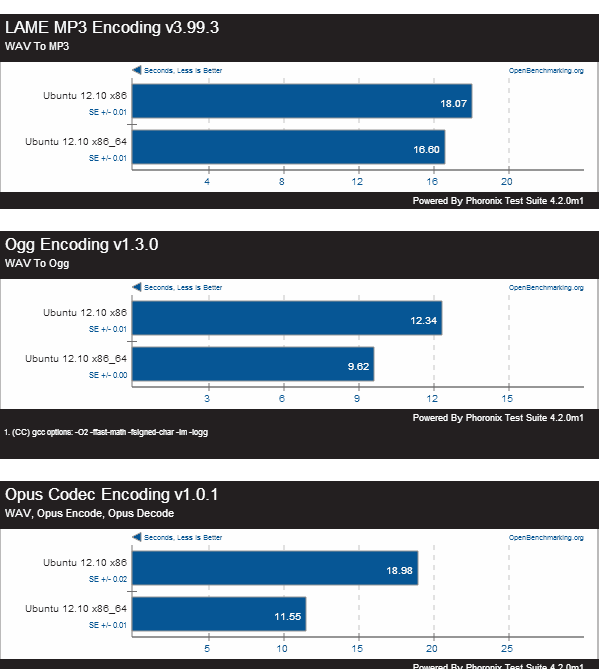
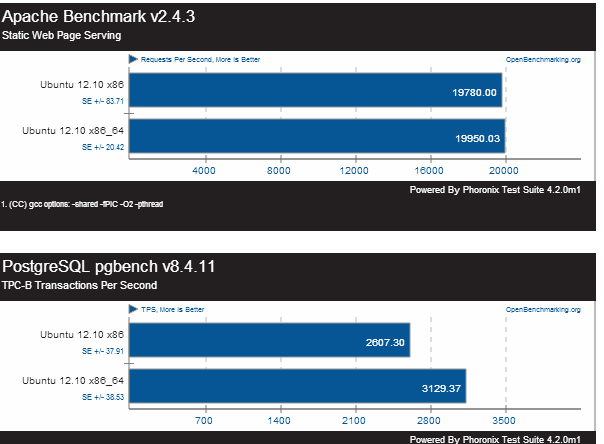
Luckily [Phoronix] had answered these questions for us. In its latest article, [Phoronix] compares the performance between 64-bit Ubuntu installation and 32-bit Ubuntu installation on a Intel Core i5 2520 (4 cores) with 4GB RAM.

Audio File Encoding Performance (less is better)

Server Workload Performance (more is better)

The result concludes that Ubuntu 12.10 64-bit performs better on overall compared to 32-bit, especially on video/audio encoding/decoding tasks. Ubuntu 12.10 also performs better with server workloads.

My thoughts:
Although Canonical still marks Ubuntu 12.10 32-bit as the recommended download. It seems that 64-bit installation offers greater performance even without the advantage of having greater memory. Some might argue that PAE still allows 32-bit Ubuntu to access more than 4GB RAM, PAE access on 32-bit is still significantly slower when compared to 64-bit memory access. Personally, I use Ubuntu 64bit for my development machine as all of my hardware has opensource drivers.


How to convert between sqlite2 and sqlite3 database

Here’s a short guide on how to convert between sqlite2 to sqlite3 database file:

sqlite2 /path/to/mysqlite2.db .dump > backupfile
sqlite3 /path/to/mynewsqlite3.db < backupfile

Using the same method, you can convert sqlite3 db to sqlite2 db too!

p/s: Why you need to convert? because embedded device (read: iPhone and Android) only supports sqlite3 database, while PHP 5 by default supports sqlite2 database.

Thus, this method provide a convenient way to convert between the two different version of sqlite db format.

Recommended Reading

How to use SVN (Subversion) on Google Code hosting

Google has generously offered free hosting services for free open source developers to host their projects either by using Mercurial, Subversion or git.

This blog post touches on the basic on to use SVN to maintain source code repository on Google Code Hosting.

Assumptions
This tutorial assume that you have :

  • Created an open source project on Google Code
  • Installed subversion on your GNU/Linux operating system
  • Have source code to import

Initial Import
You must perform initial check-in in order to use the SVN repository. To do that, you must go to your Google Code project, as shown in the screenshot.

subversion svn

From bash terminal, to import your project into Google Code, type:

svn import /path-to/src/ https://your-project-name.googlecode.com/svn/trunk/ --username example@gmail.com -m "initial import"

You'll be prompted to enter googlecode.com password, which you can generate from your Google project page

SVN commit
After initial import, your source code will be made available from Google Code hosting for public access.

You may 'commit' after you've made revision or alteration into the source code. to "commit" type:
[bash]
svn commit -m "added new TextField to user-interface"
[/bash]

the -m specifies change log, you shouldn't commit without a proper log message as this will help other users to track the changes that you've made with your source code.

SVN add: For adding new source files
If you add new files to your source code, just type:
[bash]
svn add <filename>
[/bash]

You may then proceed with "svn commit" to add the file to the repository server.

Recursively add unversioned files into SVN repository
If you've added several new files into source code working copy, these file will be unversioned and thus won't be committed to the subversion server.

You can use this command recursively add new unversioned files to svn repository.

[bash]

svn status | perl -ne 's/^\?\s+(\S.+)$/\1/g;chomp;system("svn add \"$_\"");'

[/bash]

**taken from http://www.amiryan.org/2009/04/22/howto-recursively-add-unversioned-files-into-svn-repository/

My new Android app development machine – running on Ubuntu Precise

I always wanted a smooth development machine which can run multiple virtual machine (VM) at once, which is a must when testing app that is meant to be portable across different platform. So just before Ramadhan (in July), I bought 8GB RAM and 1TB hdd from a local pc shop and proceed to set-up my development machine.

The machine already has 4GB ram so adding the extra RAM bumped it to 12GB. The machine I was running is an older Intel Core i5, which is decent enough to execute all the VM that is necessarily when developing and testing the app.


with all those RAM, seems it’ll be quite a while before I use the swap space again.