How to use SVN (Subversion) on Google Code hosting

Google has generously offered free hosting services for free open source developers to host their projects either by using Mercurial, Subversion or git.

This blog post touches on the basic on to use SVN to maintain source code repository on Google Code Hosting.

Assumptions
This tutorial assume that you have :

  • Created an open source project on Google Code
  • Installed subversion on your GNU/Linux operating system
  • Have source code to import

Initial Import
You must perform initial check-in in order to use the SVN repository. To do that, you must go to your Google Code project, as shown in the screenshot.
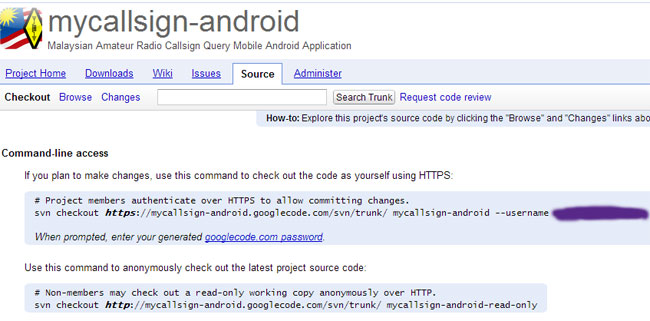
subversion svn

From bash terminal, to import your project into Google Code, type:

svn import /path-to/src/ https://your-project-name.googlecode.com/svn/trunk/ --username example@gmail.com -m "initial import"

You'll be prompted to enter googlecode.com password, which you can generate from your Google project page

SVN commit
After initial import, your source code will be made available from Google Code hosting for public access.

You may 'commit' after you've made revision or alteration into the source code. to "commit" type:
[bash]
svn commit -m "added new TextField to user-interface"
[/bash]

the -m specifies change log, you shouldn't commit without a proper log message as this will help other users to track the changes that you've made with your source code.

SVN add: For adding new source files
If you add new files to your source code, just type:
[bash]
svn add <filename>
[/bash]

You may then proceed with "svn commit" to add the file to the repository server.

Recursively add unversioned files into SVN repository
If you've added several new files into source code working copy, these file will be unversioned and thus won't be committed to the subversion server.

You can use this command recursively add new unversioned files to svn repository.

[bash]

svn status | perl -ne 's/^\?\s+(\S.+)$/\1/g;chomp;system("svn add \"$_\"");'

[/bash]

**taken from http://www.amiryan.org/2009/04/22/howto-recursively-add-unversioned-files-into-svn-repository/

My new Android app development machine – running on Ubuntu Precise

I always wanted a smooth development machine which can run multiple virtual machine (VM) at once, which is a must when testing app that is meant to be portable across different platform. So just before Ramadhan (in July), I bought 8GB RAM and 1TB hdd from a local pc shop and proceed to set-up my development machine.

The machine already has 4GB ram so adding the extra RAM bumped it to 12GB. The machine I was running is an older Intel Core i5, which is decent enough to execute all the VM that is necessarily when developing and testing the app.


with all those RAM, seems it’ll be quite a while before I use the swap space again.

How to recover GRUB using Ubuntu Live CD (12.04 LTS)

Sometimes for some reason when you installed Microsoft Windows or other operating systems, your GRUB installation will be overwritten. This will cause your Ubuntu operating system unable to boot.

Here’s how to solve the problem using Ubuntu LTS Live CD:

1. First boot the Ubuntu Live CD from your computer

2. Then, open terminal-emulator application, and add boot-repair application to Ubuntu repository
[bash]
$ sudo add-apt-repository ppa:yannubuntu/boot-repair
[/bash]

3. Update repository and install boot-repair
[bash]
$ sudo apt-get update
$ sudo apt-get install -y boot-repair
[/bash]

4. Then run boot repair by typing “boot-repair” at the bash prompt

To begin repairing/reinstalling GRUB, click on “Recommended Repair” at the application screen:
grub boot-repair

The “Advance” button offers other option that lets you customize the boot option.
grub boot-repair

Boot-repair lets you to:
1. Reinstall GRUB bootloader
2. Change the default OS to boot
3. Place boot flag on any partition or devices.
4. Add extra kernel option
5. Restore MBR (only when necessary!)
6. Repair filesystem (only when necessary!)

Official Boot-repair website: http://sourceforge.net/p/boot-repair/home/Home/

Ubuntu Community Page on Boot-repair: https://help.ubuntu.com/community/Boot-Repair

Solving choppy and distorted sound while playing back video on Ubuntu 12.04 LTS (Precise Pangolin)

Since installing Ubuntu 12.04 LTS on my Core I5 computer, I’ve noticed that I’ve problem with Video/Audio playback on my computer.

It turns out that it only affects computer with Intel-based sound chip. To confirm that you have Intel based audio chip, you need to run this command:

sudo lshw -c multimedia

If Intel chip is present, then you should see something like this at the bottom of the output:
[bash]
configuration: driver=snd_hda_intel latency=32
resources: irq:16 memory:fe024000-fe027fff

[/bash]

To fix it, you need to add “options snd-had-intel model=generic” at the end of /etc/modprob.d/alsa-base.conf file.

This should fix the problem with choppy/laggy sound while playing video.

Generate EAN,UPC,ISBN barcodes in Ubuntu / Debian Linux

‘barcode‘ is a utility in Debian GNU/Linux distribution used for generating common 1-D barcode: EAN-13, EAN-8, UPC, ISBN, code93, code128 & codabar.
barcode outputs file in postscript format which can be converted to PDF with the ‘ps2pdf‘ utility

Usage:

1. Outputs isbn barcode and converts it to PDF file

$  barcode -o barcode.ps -e isbn
$  ps2pdf barcode.ps

2. Outputs EAN-13 barcode

$ barcode -o barcode-ean.ps -e ean

If you are looking for a tool that could generate QR Code, then you can try ‘qrencode‘