How to install NGINX with PageSpeed module in Ubuntu LTS / Debian

UPDATE: You can now install NGINX with PageSpeed in Ubuntu LTS with deb package: https://blog.mypapit.net/2015/08/install-nginx-with-pagespeed-using-deb-for-ubuntu-lts-amd64.html

INSTALLING NGINX USING UBUNTU APT-GET SOURCE
PageSpeed modules are open source modules developed by Google Inc that can perform website optimization to ensure faster site delivery, automatically.

PageSpeed module is not included in NGINX installation in Ubuntu or Debian. So you need to recompile NGINX together with PageSpeed module, to enable its functionality.

You can install NGINX 1.8.0 with PageSpeed for Ubuntu 14.04 LTS here, using dpkg:
or you can compile it from source code using apt-get.

There are several steps to this method, first you need to get the latest nginx stable (or mainline) from PPA (optional)

#this step is optional, only if you want to get the latest Ubuntu version of nginx

sudo apt-get -y install software-properties-common

sudo -s

nginx=stable # use nginx=development for latest development version
add-apt-repository ppa:nginx/$nginx

apt-get update 

apt-get -y upgrade

Then, you’ve to install dpkg-dev, unzip utility and nginx source from apt repository

apt-get -y install dpkg-dev unzip

apt-get install nginx

apt-get source nginx

After that, you need to download PageSpeed module, this instruction is adapted from

https://developers.google.com/speed/pagespeed/module/build_ngx_pagespeed_from_source

**note replace ${NGINX_VERSION} with the version of NGINX available from apt-get, in my case – its “1.8.0”

cd
export NPS_VERSION=1.9.32.4
export NGINX_VERSION=1.8.0

wget -c https://github.com/pagespeed/ngx_pagespeed/archive/release-${NPS_VERSION}-beta.zip

unzip release-${NPS_VERSION}-beta.zip

cd ngx_pagespeed-release-${NPS_VERSION}-beta/

wget -c https://dl.google.com/dl/page-speed/psol/${NPS_VERSION}.tar.gz

tar -xzvf ${NPS_VERSION}.tar.gz

cd nginx-${NGINX_VERSION}

Install all build dependencies (your configuration may varies, but i keep it within default Ubuntu configuration.

apt-get -y install libpcre3-dev libssl-dev libxslt1-dev libgd-dev libgeoip-dev geoip-bin geoip-database libpam0g-dev zlib1g-dev memcached

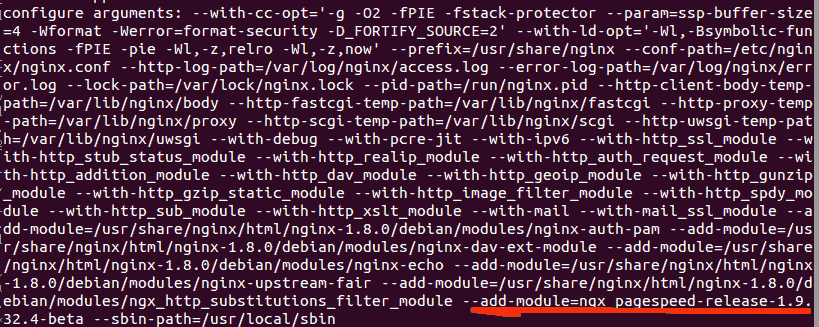
Then configure nginx, remember to replace ${NGINX_VERSION} with your current version of NGINX. In my case, its “1.8.0”

cd nginx-${NGINX_VERSION}

./configure  --with-cc-opt='-g -O2 -fPIE -fstack-protector --param=ssp-buffer-size=4 -Wformat -Werror=format-security -D_FORTIFY_SOURCE=2' --with-ld-opt='-Wl,-Bsymbolic-functions -fPIE -pie -Wl,-z,relro -Wl,-z,now' --prefix=/usr/share/nginx --conf-path=/etc/nginx/nginx.conf --http-log-path=/var/log/nginx/access.log --error-log-path=/var/log/nginx/error.log --lock-path=/var/lock/nginx.lock --pid-path=/run/nginx.pid --http-client-body-temp-path=/var/lib/nginx/body --http-fastcgi-temp-path=/var/lib/nginx/fastcgi --http-proxy-temp-path=/var/lib/nginx/proxy --http-scgi-temp-path=/var/lib/nginx/scgi --http-uwsgi-temp-path=/var/lib/nginx/uwsgi --with-debug --with-pcre-jit --with-ipv6 --with-http_ssl_module --with-http_stub_status_module --with-http_realip_module --with-http_auth_request_module --with-http_addition_module --with-http_dav_module --with-http_geoip_module --with-http_gunzip_module --with-http_gzip_static_module --with-http_image_filter_module --with-http_spdy_module --with-http_sub_module --with-http_xslt_module --with-mail --with-mail_ssl_module --add-module=debian/modules/nginx-auth-pam --add-module=debian/modules/nginx-dav-ext-module --add-module=debian/modules/nginx-echo --add-module=debian/modules/nginx-upstream-fair --add-module=debian/modules/ngx_http_substitutions_filter_module --sbin-path=/usr/local/sbin --add-module=$HOME/ngx_pagespeed-release-${NPS_VERSION}-beta

After that, run make and make install

make

make install

The newly compiled nginx will be installed in “/usr/local/bin” without overwriting the original binary file.

Create nginx-pagespeed /etc/init.d file

Optionally you may duplicate nginx in init.d, and rename it to nginx-pagespeed, and stop the original nginx server

cp /etc/init.d/nginx /etc/init.d/nginx-pagespeed

sed -i 's|/usr/sbin/nginx|/usr/local/sbin/nginx|g' /etc/init.d/nginx-pagespeed

service nginx stop

You may also enable basic PageSpeed config in /etc/nginx/conf.d/

nano /etc/nginx/conf.d/pagespeed.conf

And add these basic PageSpeed config

#file /etc/nginx/conf.d/pagespeed.conf
        pagespeed on;
        pagespeed FetchWithGzip on;

        pagespeed FileCachePath /run/shm/pagespeed_cache;
        pagespeed RewriteLevel CoreFilters;

Save the file, and test nginx config, after that, start nginx-pagespeed service.

/usr/local/sbin/nginx -t

service nginx-pagespeed start

**Note: This instruction has been tested under Ubuntu 14.04 LTS with nginx 1.8.0 from ppa:nginx/stable respository. The LTS is chosen because it has much longer support for server, and nginx 1.8.0 supports both spdy 3.1 and latest PageSpeed.

***Please share any thoughts or opinion or suggested correction if this guide didn’t work for you. Thanks!!

Recommended Reading

How to change timezone in Ubuntu / Debian from command-line

This guide assumes that you use Ubuntu or Debian-based GNU/Linux distro. There are two ways to change timezone from bash command line.

sudo dpkg-reconfigure tzdata

or,

sudo ln -sf /usr/share/zoneinfo/Asia/Kuala_Lumpur /etc/localtime

You can also specify other timezone in the second method, for example:

sudo ln -sf /usr/share/zoneinfo/GMT /etc/localtime

or for Eastern Standard Time (US)

sudo ln -sf /usr/share/zoneinfo/EST /etc/localtime

This command is handy when administrating multiple servers across different continents.

IPdeny.com – Download collections of Country IP Addresses

IPdeny.com is a service which offers a free collection of Regional and Country IP address blocks list.

ipdeny

The IP address blocks is useful for application developer and system administrator to enhance their system. For example, application developer can use the information redirect users from certain countries to regional websites or pages, or a system administrator can use the IP address information to isolate users from different countries.

How to Optimize and speed up PHP with OPCache

PHP 5.5 and 5.6 comes with OPCache. OPCache speeds up PHP execution by storing precompile bytecode of PHP in shared memory. Taking advantage of fast memory operations compared to hard disk operation, OPCache eliminates the process of having to read PHP scripts from the disk each time whenever a script must be executed.

In short, OPCache saves the time needed to serve PHP-powered websites!

How to enable OPCache?
This tutorial is written from Ubuntu 14.04 LTS standpoint – using php5-fpm, but it should also work for other Linux distro.

  1. First edit ‘/etc/php5/fpm/php.ini‘ file.
  2. Find “opcache” section in the PHP ini.
  3. Uncomment and change opcache.enable to opcache.enable=1
  4. Do the same for >opcache.memory_consumption, changed its value from 64 to 128 (or 256)
  5. Change opcache.interned_strings_buffer from 4 to 16
  6. Changed the opcache.max_accelerated_files to 8192

Activate OPCache with php5enmod command.

sudo php5enmod opcache

Save file and restart php5-fpm.

sudo service php5-fpm restart

PHP OPCache should be running on your server now. Here’s a reference of /etc/php/fpm/php.ini file in Ubuntu 14.04 LTS.

[opcache]
; Determines if Zend OPCache is enabled
opcache.enable=1

; Determines if Zend OPCache is enabled for the CLI version of PHP
opcache.enable_cli=0

; The OPcache shared memory storage size.
opcache.memory_consumption=128

; The amount of memory for interned strings in Mbytes.
opcache.interned_strings_buffer=16

; The maximum number of keys (scripts) in the OPcache hash table.
; Only numbers between 200 and 100000 are allowed.
opcache.max_accelerated_files=8192

BONUS: How to verify whether PHP OPCache is running ??
You can verify whether OPCache is running by using opcache-status by Rasmus Lerdorf. Just drop the script in one of your web directory and browse. If you’re not a Git fan, I’ve also have taken the liberty of mirroring the download: opcache-status.zip

opcache-status screenshot
opcache-status-ss

Checking if website is Mobile-Friendly

Google has announced that they will take Mobile-Friendly site into account when indexing sites. Thus, it is prudent to ensure the particular website that you’re maintaining is mobile friendly.

There are two main tools released by Google for testing if the website is Mobile-Friendly:

  1. Google Mobile Friendly Test
  2. PageSpeed Insights

However, personally I like PageSpeed Insights tool better because it gave more in-depth explanation on how to improve my site.

mobile-friendly-test

Have fun trying out.

Stop Comment spams with IP Blacklist Cloud

Comment spams is the bane of any website operator that rely on real human interaction. Stopping comment spams by hand is a tedious process especially when comment spam attacks are sophisticated and are launched from Botnet. There are several techniques that can be employed to fight comment spams including behavioral analysis and also IP analysis.

In maintaining WordPress and Joomla sites, I myself has analyzed several web logfiles and Cloudflare logs to learn that most comment spam originated from certain ip blocks and countries. Therefore, I decided to completely deny access from those affected ip block through firewall (which keep the comment spam low and saves web server resources!)

ipblc_server

However, recently I found a new service IP Blacklist Cloud which list the top most blacklisted ip address through collaborative effort. Normally I find blacklisting by ip address is tedious and probably harmful to legitimate visitors, however after conforming the ip addresses that I found inside my spam logs, I decided the list is legitimate and decided to firewall-block some of the worst offenders in the list.

IP Blacklist Cloud free WordPress plugins, which I personally does not use due to my policy of keeping my installation lean with minimal (to no plugins!), however I see that there’s no harm giving a shot!