Digitalocean upgraded their Droplets hosting Offering

Good news for those looking for VPS hosting solution. Digitalocean has upgraded their droplet offering by increasing the diskpace and RAM at the same price point.

Here are the new Droplets package from Digitalocean:

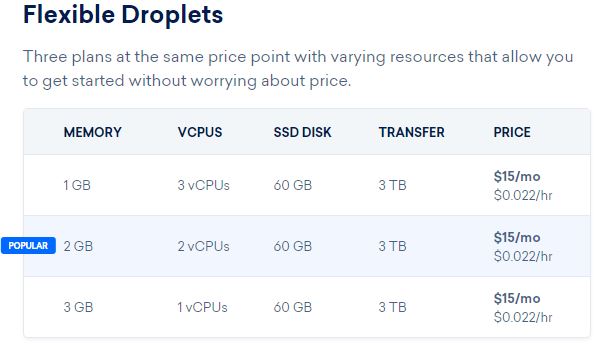
The most interesting plan is Flexible droplets where you can resize the droplets at any time choosing between with RAM or vCPU at the same price point.

Benefit for existing customer:

Existing customer can enjoy the new price point by clicking “Resize” option to get the new offering from Digitalocean

Benefit for new customers:

New customer will enjoy USD10 giveaway when signing up with Digitalocean. Remember that Digitalocean charges by hour, so you can test drive their VPS in a few days and can decide whether you want to continue or not with their service without any penalty

Securing SSH port and limiting IP address connection with Firewall in Ubuntu

UFW: Securing SSH
UFW or Uncomplicated Firewall is a firewall package in Ubuntu. UFW can be used to secure SSH ports in Ubuntu server.

In order to secure OpenSSH, we must first disable UFW and allow all SSH rule.

sudo ufw disable
sudo ufw delete allow ssh

Then we add IP Address to be allowed to connect to SSH port. In this case I assume that “192.168.1.10” would be allowed to be connected to the server. You can replace IP Address, with any IP Address that you prefer.

sudo ufw allow from 192.168.1.10 to any port ssh

You can also add other IP Address that can be connected to SSH port. In this case, I chose em>”172.25.100.1″.

sudo ufw allow from 172.25.100.1 to any port ssh

Alternatively, you could also specify port number and protocol

sudo ufw allow from 192.168.1.10 to any port 22 proto tcp

Only allow SSH connections from certain subnets

sudo ufw allow from 192.168.1.0/24 to any port 22 proto tcp

Note: Adding firewall rules to only allow SSH connection from certain subnets would increase the server security, further reducing brute-force attack.

Further Reading: Ubuntu Server Administrator Reference

How to send fail2ban notification with Telegram (telegram-cli)

This is a a guide to integrate Telegram messaging service Fail2Ban. With this integration, Fail2Ban notification will be sent through Telegram services.

t_logo

Requirements

  1. You need to have Fail2ban installed in your systems.
  2. Install or compile “telegram-cli”, refer to this guide to compile telegram-cli or install it from *.deb (Ubuntu LTS) AMD64

Setting Up Fail2Ban with Telegram

After installing ‘telegram-cli’ and its requirements, you should proceed to add ‘telegram.conf’ config in /etc/fail2ban/action.d

The content of telegram.conf is as follows.

#
# /etc/fail2ban/action.d/telegram.conf
#
# Author: Toon Ketels
# Modified by: Mohammad Hafiz bin Ismail [mypapit @gmail.com]
#
# $Revision$
#

[Definition]

# Option:  actionstart
# Notes.:  command executed once at the start of Fail2Ban.
# Values:  CMD
#
actionstart = /usr/share/fail2ban/fail2ban-telegram.sh start

# Option:  actionstop
# Notes.:  command executed once at the end of Fail2Ban
# Values:  CMD
#
actionstop = /usr/share/fail2ban/fail2ban-telegram.sh stop

# Option:  actioncheck
# Notes.:  command executed once before each actionban command
# Values:  CMD
#
actioncheck =

# Option:  actionban
# Notes.:  command executed when banning an IP. Take care that the
#          command is executed with Fail2Ban user rights.
# Tags:    [ip]  IP address
#          [failures]  number of failures
#          [time]  unix timestamp of the ban time
# Values:  CMD
#
actionban = /usr/share/fail2ban/fail2ban-telegram.sh ban [ip]

# Option:  actionunban
# Notes.:  command executed when unbanning an IP. Take care that the
#          command is executed with Fail2Ban user rights.
# Tags:    [ip]  IP address
#          [failures]  number of failures
#          [time]  unix timestamp of the ban time
# Values:  CMD
#
actionunban = /usr/share/fail2ban/fail2ban-telegram.sh unban [ip]

[Init]

init = 'Fail2Ban Telegram plugins activated"


Then, you need to create a script file in /usr/share/fail2ban/fail2ban-telegram.sh.

#!/bin/bash
# /usr/share/fail2ban/fail2ban-telegram.sh
#
# Sends text messages using telegram api
# to alert server administrator of ip banning.
#
# Requires one argument, one of the following:
#  start
#  stop
#  ban
#  unban
#
# Optional second argument: IP for ban/unban


#replace this with your own telegram contact

to=Telegram_peer_replace_this

# Display usage information
function show_usage {
  echo "Usage: $0 action [ip]"
  echo "Where action is start, stop, ban, unban"
  echo "and ip is optional passed to ban, unban"
  exit
}


# Actually send telegram messages
# Expects the telegram content (body) to be passed
# as argument.
function send_telegram {

  msg="[`date -Iminutes`] - `hostname`:  Notice: $1 "
  echo "$msg" >> /var/log/fail2ban-telegram.log
 (echo "contact_list";sleep 30;echo "msg $to $msg"; echo "safe_quit") | telegram-cli
  exit
}


# Check for script arguments
if [ $# -lt 1 ]
then
  show_usage
fi


# Take action depending on argument
if [ "$1" = 'start' ]
then
  message="Fail2ban just started."
  send_telegram "$message"
elif [ "$1" = 'stop' ]
then
  message="Fail2ban just stopped."
  send_telegram "$message"
elif [ "$1" = 'ban' ]
then
  message=$([ "$2" != '' ] && echo "Fail2ban just banned $2" || echo 'Fail2ban just banned an ip.' )
  send_telegram "$message"
elif [ "$1" = 'unban' ]
then
  message=$([ "$2" != '' ] && echo "Fail2ban just unbanned $2" || echo "Fail2ban just unbanned an ip." )
  send_telegram "$message"
else
  show_usage
fi

After that, you need to ensure that the script is executable, by running.

sudo chmod a+rwx /usr/share/fail2ban/fail2ban-telegram.sh

Then, you need to edit “/etc/fail2ban/jail.conf” file to hook the action plugin with events. In this case, I choose the ssh and sshd events.

sudo nano -c /etc/fail2ban/jail.conf

Then proceed to find the [ssh] and [ssh-ddos] part. Add ‘telegram’ config in the file. Replace the “webmaster@example.com” email address with your email address.

[ssh]

enabled  = true
port     = ssh
filter   = sshd
logpath  = /var/log/auth.log
maxretry = 3
action = mail-whois[name=SSH, dest=webmaster@example.com]
         telegram

Now go to the “ssh-ddos” section, repeat the same step.

[ssh-ddos]

enabled  = true
port     = ssh
filter   = sshd-ddos
logpath  = /var/log/auth.log
maxretry = 4
action = mail-whois[name=SSH, dest=webmaster@example.com]
         telegram

Finishing up: Restart Fail2Ban

Finish up by restarting fail2ban server, and if you done it correctly you will be receiving both telegram messages and email notification regarding fail2ban startup!

sudo service fail2ban restart

Sample Screenshot

telegram-fail2ban

Congratulations!!

How to quickly become firewall expert with UFW !

Uncomplicated Firewall (UFW) is a helper tool which allows you to quickly setup iptables firewall in any Ubuntu server. It is installed by default and it allows you to secure your server at no time!

Basic UFW

Basic UFW: Check Status
You can check UFW by running this command. The verbose argument prints additional information such as UFW profiles, logging settings.

The ‘numbered’ argument prints the list of rules with line number. I’ll explain later on the use of this feature.

sudo ufw status
sudo ufw status verbose
sudo ufw status  numbered

Basic UFW: Enable and Disable Firewall
You can easily enable and disable firewall by specifying ‘disable’ and ‘enable’ argument.

Warning : Please do not enable UFW if you’re connecting using SSH connection to your Ubuntu box, you might be disconnected.

sudo ufw disable
sudo ufw enable

Basic UFW: Setting up default rule and Enabling SSH
A lot of you might be connecting to Ubuntu box using SSH connections, so the first step is to setup a default rule and enabling SSH connection.

Deny incoming connection

sudo ufw default deny incoming

Allow incoming SSH connection

sudo ufw allow ssh

Alternatively you can write:

sudo ufw allow 22/tcp

Finally, enable firewall

sudo ufw enable

You can check the firewall rules by running

sudo ufw status

Basic UFW: Enabling other service: HTTP, HTTPS

Enabling web server port and https is as easy as running

sudo ufw allow http
sudo ufw allow https

Basic UFW: Deleting rule
You can delete UFW rule by running

sudo ufw delete allow https

or by specifying its port and protocol

sudo ufw delete allow 443/tcp

Additionally you could also delete rule using its number by running “ufw status numbered” first

sudo ufw status numbered
ufw status numbered
Status: active

     To                         Action      From
     --                         ------      ----
[ 1] 22                         ALLOW IN    Anywhere
[ 2] 22/tcp                     ALLOW IN    Anywhere
[ 3] 443                        ALLOW IN    Anywhere
[ 4] 22 (v6)                    ALLOW IN    Anywhere (v6)
[ 5] 22/tcp (v6)                ALLOW IN    Anywhere (v6)
[ 6] 443 (v6)                   ALLOW IN    Anywhere (v6)

Then pick a firewall rule based on its number to delete, I picked number 3 and 6, because I want to delete https rule

sudo ufw delete 3
sudo ufw delete 6

UFW will print a confirmation prompt and you can continue deleting the firewall rules

/home/mypapit# ufw delete 6
Deleting:
 allow 443
Proceed with operation (y|n)? y   
Rule deleted (v6)

/home/mypapit# ufw delete 3
Deleting:
 allow 443
Proceed with operation (y|n)? y
Rule deleted

Intermediate UFW

Intermediate UFW: Deny access from ip address or ip block
You can prevent certain ip address or ip blocks / subnets from reaching your server by running:

sudo ufw deny from 172.18.44.12

Deny an ip address subnet

sudo ufw deny from 172.18.44.0/24

Deny an ip address subnet, example #2

sudo ufw deny from 172.16.0.0/16

Intermediate UFW: Allow services to be connected from certain ip address or subnet
In this case, I will only allow certain ip address to connect to my SSH port.

First we delete the old – “allow all” SSH rule

sudo ufw disable
sudo ufw delete allow ssh

Then we add ip address to be allowed to connect to SSH port

sudo ufw allow from 192.168.20.40 to any port ssh

Alternatively, you could also specify port number and protocol

sudo ufw allow from 192.168.20.40 to any port 22 proto tcp

Only allow SSH connections from certain subnets

sudo ufw allow from 192.168.20.0/24 to any port 22 proto tcp

Note: Adding firewall rules to only allow SSH connection from certain subnets would increase the server security, further reducing brute-force attack.

Further Reading: Ubuntu Server Administrator Reference