How to Change OpenSSH port or listen to multiple SSH ports

OpenSSH usually listens on TCP port 22. However, there are some people who wish to change OpenSSH port to avoid brute-force bot attacks or to avoid from being blocked by restrictive firewall.

To change OpenSSH port, one only need to edit “/etc/ssh/sshd_config” file and change the port at “Port 22” to something else, like “Port 8080” or “Port 443”

#/etc/ssh/sshd_config
# What ports, IPs and protocols we listen for
Port 8080

Save, and restart ssh server.

sudo service ssh restart

Additionally you can also configure OpenSSH to listen to multiple port (usually to avoid restrictive firewall rules)

#/etc/ssh/sshd_config
# What ports, IPs and protocols we listen for
Port 22
Port 8080
Port 443

The example above shows a configuration which lets OpenSSH to listen to port 22, 443 (TLS/SSL) and port 8080 (HTTP-PROXY), these are the ports that usually unblocked by corporate firewall.

Don’t forget to restart ssh service as soon as you’ve save the file!!

How to Hide OpenSSH Ubuntu version from Nmap and other scanners

In Ubuntu or Debian, a default OpenSSH server will display OpenSSH version alongside with Ubuntu/Debian distribution banner:

$ telnet repeater.my 172.16.91.20 22 
Trying 172.16.91.20...
Connected to 172.16.91.20.
Escape character is '^]'.
SSH-2.0-OpenSSH_6.6.1p1 Ubuntu-2ubuntu2

You can hide the identifying part of Ubuntu-2ubuntu2 from the server banner by editing /etc/ssh/sshd_config file, and adding “DebianBanner no” either at the end of the file, or just under “Port 22” configuration in “/etc/ssh/sshd_config

#/etc/ssh/sshd_config 
# What ports, IPs and protocols we listen for

Port 22
DebianBanner no

Save and restart OpenSSH server by typing

sudo service ssh restart

Now the response will just be:

Trying 172.16.91.20...
Connected to 172.16.91.20.
Escape character is '^]'.
SSH-2.0-OpenSSH_6.6.1p1

Happy trying!

Further Reading: Ubuntu Server Administrator Reference

FastSSH.com – free SSH tunnelling account !

FastSSH.com is a provider for FreeSSH account, which can be use for secure tunneling account or to avoid from Firewall.

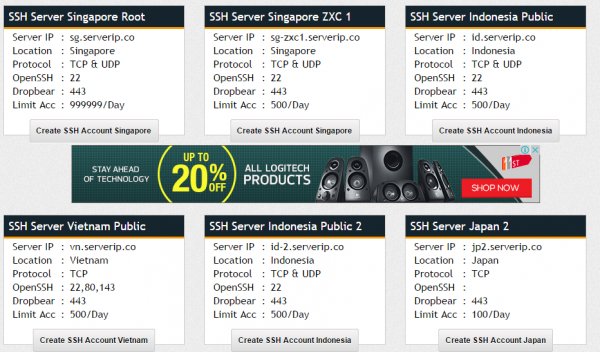
User has to select SSH account from a set of locations (refer to picture below), which has its own features and limited. (ie: some server offer protocol forwarding in UDP and TCP, while some impose limit on 500 connections/day).

fastssh-selection

Creating an account is as easy as filling the “Account Creation Form”, which does not require email. Account created through FastSSH is valid for SEVEN(7) days.

fastssh-selection-4

However, I personally do not use FastSSH as I’ve my own box, and relying on a 3rd party SSH provider for my tunneling needs would pose security concerns over sensitive data. You’ve been warned.

*FastSSH does not offer UNIX shell, instead it only offers SSH tunneling service. See Simple SSH Tunelling Tips and SSH port forwarding in Microsoft Windows for more information on SSH tunelling

Simple SSH Tunnelling tips

SSH tunelling is usually used to avoid firewall restriction or to ensure point-to-point encrypted communication.

For example, if you want to send email to smtp server “smtp.yourserver.com” on port 587, but your organization currently blocking smtp port 25 and 587, then you can benefit from SSH tunelling to avoid from being blocked.

To get around that, you need an intermediate server, fastssh.com currently provide SSH tunneling service with 7days trial account.

Simple SSH tunnelling command, if you’re using fastssh.com service.

ssh -f fastssh.com-username@sg.fastssh.com -L 2000:smtp.yourserver.com:587 -N

So in your mail setting, you can safely put, SMTP Server = “127.0.0.1”, SMTP port = “2000” in your setting, in order to automagically connect to “smtp.yourserver.com” port 587 without firewall restriction.

Please refer here, for port forwarding in Microsoft Windows environment using PuTTY

Tips for Securing SSH in Linux Box (Securing SSH Series)

Secured Shell or SSH is a great way to enable a secure login for your UNIX / Linux Box. However there are precaution that you should take in order to properly secure SSH daemon from being scanned or attacked by script kiddies or automated bots.

This week I’m going to write a series of article on securing SSH on Ubuntu Linux Box (VPS) and I’m going to link to this post from time to time.

  1. Disable Root login, enable SSH login for a handful of users only
  2. Install and configure Fail2Ban
  3. Limit access with Firewall Rules (limit by ip block, or ip address)
  4. Limit connection rate to SSH port
  5. Disable keyboard interactive login, Use public-key login
  6. Security Security through obscurity: Hiding SSH version
  7. Security Security through obscurity: Change default SSH ports

Hope this will help in securing your Linux Box / Linux VPS

Solving SSH “channel 3: open failed: administratively prohibited” error when tunnelling

A couple of days ago, I’ve encountered this error when I was trying to create a SSH tunnel from my office LAN to a remote server.

After looking for a solution, I found out that the remote SSH server must add “PermitTunnel yes” line in “/etc/ssh/sshd_config” file.

To do that, you need to:

sudo echo "PermitTunnel yes" >> /etc/ssh/sshd_config
service sshd restart

The second line is used to restart the ssh service in order to enable the changes.