How to build and use telegram-cli client for Linux

You can actually send Telegram message from command-line interface / bash in Linux using an unofficial telegram-cli client by Vitali Valtman (vysheng)

Obtaining and Compiling telegram-cli

But first, before sending telegram messages, you need to build the client. You may start by installing its dependencies

 sudo git apt-get install libreadline-dev libconfig-dev libssl-dev lua5.2 liblua5.2-dev libevent-dev libjansson-dev libpython-dev make 

Then, you can get the latest telegram-cli client from vysheng GitHub

 git clone --recursive https://github.com/vysheng/tg.git && cd tg

Afterwards, you may configure ‘telegram-cli’ and compile it

./configure
make

Alternative Download
Alternatively, you can download Telegram source code from my server:

  1. https://mypapit.net/pub/telegram-cli/tg.tar.bz2
  2. https://mypapit.net/pub/telegram-cli/tg.tar.xz


Running telegram-cli

After finished compiling telegram-cli, you may try and start using telegram.

bin/telegram-cli -k tg-server.pub

For first time use, you may need to key in the authorization code, the code will be sent to your mobile device to allow ‘telegram-cli’ to log as your username.

bin/telegram-cli -u  -k tg-server.pub

In my experience you may need to replace the +[country_code] phone-number with ’00’. so if your phone number includes country code is +60123456789, then you must replace it with 0060123456789 (however, your mileage may vary.

bin/telegram-cli -u 00123456789 -k tg-server.pub

Once the authorization CODE has been entered, you are free to use telegram. Telegram use the concept of ‘peer’ (contact) to send messages instead of phone number. So in order to get a list of your peer, you need to run “contact_list” command.
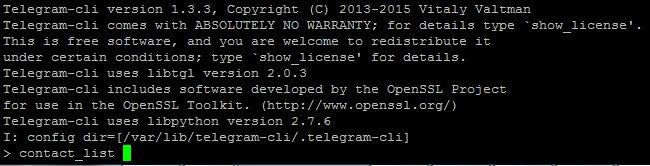
telegram-cli-contact-list

> contact_list
John_T_Doe
Jane_doe_2
Warrick_Brown
Mark_Nelson

To send message to a peer/contact (for example to Warrick Brown), just type

> msg Warrick_Brown "wassup, dude? want to hang out today?"

To quit, you can type

#telegram-client
> safe_quit

NOTE: IF YOU FAIL TO COMPILE TELEGRAM FROM GITHUB
If you find it difficult or failed to compile telegram-cli from GitHub, then you can download this telegram-cli source code from my server which is tested to compile under Raspbian Jessie, Debian Jessie, Ubuntu 14.04 LTS and Ubuntu 16.04 LTS.

Alternative Telegram source code:

  1. https://mypapit.net/pub/telegram-cli/tg.tar.bz2
  2. https://mypapit.net/pub/telegram-cli/tg.tar.xz

Howto install OwnCloud with NGINX in Ubuntu LTS

OwnCloud is a PHP-based Cloud-storage web application for remote storage with file synchronization capabilities.

Step 1
You need to install several packages in order to configure OwnCloud with nginx in your server

sudo apt-get -y install nginx-full php5-fpm php5-sqlite

Step 2: Download Owncloud
Download Owncloud, replace $OWNCLOUD_VER with the latest Owncloud version.

export OWNCLOUD_VER="8.1.0"
cd /var/www/
sudo wget -c https://download.owncloud.org/community/owncloud-${OWNCLOUD-VER}.tar.bz2

Step 3: Extract Owncloud
This will extract owncloud to /var/www/owncloud/

cd /var/www/
tar jxvf owncloud-${OWNCLOUD-VER}.tar.bz2

Step 4: Setup Nginx
You need to setup NGINX

cd /etc/nginx/sites-available
sudo nano -c /etc/nginx/sites-available/owncloud

Step 4a: Setup ‘owncloud’ nginx site

Please change server_name directive to your own ip address or your own domain.
You can also download textfile and upload it directly to your server: http://pastebin.com/2P8h1zNB

#
#/etc/nginx/sites-available/owncloud
# 
server {
  listen 80;
server_name cloud.example.com;
server_name 192.168.1.47;

  # Path to the root of your owncloud installation
  root /var/www/owncloud/;
  # set max upload size
  client_max_body_size 10G;
  fastcgi_buffers 64 4K;

  # Disable gzip to avoid the removal of the ETag header
  gzip off;

  # Uncomment if your server is build with the ngx_pagespeed module
  # This module is currently not supported.
  #pagespeed off;

  rewrite ^/caldav(.*)$ /remote.php/caldav$1 redirect;
  rewrite ^/carddav(.*)$ /remote.php/carddav$1 redirect;
  rewrite ^/webdav(.*)$ /remote.php/webdav$1 redirect;

  index index.php;
  error_page 403 /core/templates/403.php;
  error_page 404 /core/templates/404.php;

  location = /robots.txt {
    allow all;
    log_not_found off;
    access_log off;
    }

  location ~ ^/(?:\.htaccess|data|config|db_structure\.xml|README){
    deny all;
    }

  location / {
   # The following 2 rules are only needed with webfinger
   rewrite ^/.well-known/host-meta /public.php?service=host-meta last;
   rewrite ^/.well-known/host-meta.json /public.php?service=host-meta-json last;

   rewrite ^/.well-known/carddav /remote.php/carddav/ redirect;
   rewrite ^/.well-known/caldav /remote.php/caldav/ redirect;

   rewrite ^(/core/doc/[^\/]+/)$ $1/index.html;

   try_files $uri $uri/ /index.php;
   }

   location ~ \.php(?:$|/) {
   fastcgi_split_path_info ^(.+\.php)(/.+)$;
   include fastcgi_params;
   fastcgi_param SCRIPT_FILENAME $document_root$fastcgi_script_name;
   fastcgi_param PATH_INFO $fastcgi_path_info;
	  fastcgi_pass unix:/var/run/php5-fpm.sock;
   }

   location ~* \.(?:jpg|jpeg|gif|bmp|ico|png|css|js|swf)$ {
       expires 30d;
       # Optional: Don't log access to assets
         access_log off;
   }

  }

Step 4b: Enable ‘owncloud’ settings

cd /etc/nginx/sites-enable/
sudo ln -sf ../sites-available/owncloud .
nginx -t
service nginx restart
service php5-fpm restart

Step 5: Finishing off Owncloud setup

cd /var/www/
mkdir /var/www/owncloud/data
chmod 0770 /var/www/owncloud/data
chmod 0770 /var/www/owncloud/lib/private/
sudo chown -R www-data.www-data /var/www/owncloud

Step 6: Goto the IP-Address or domain name of your owncloud installation

First screen
setup-owncloud-first

Welcome to Owncloud
welcome-to-owncloud

Owncloud File Manager and Settings
owncloud-filemanager

What’s Next?

After completing installation you may:

  1. Install Android, iPhone or Desktop client to sync all your files
  2. Install TLS/SSL Certificates to secure your Owncloud connection
  3. Install MariaDB/MySQL for efficient synchronization

Warning: Do not enable Pagespeed and SPDY in OwnCloud

OwnCloud servers does not support PageSpeed and SPDY module, so please disable those extension if its exists within your nginx configuration.

Recommended Owncloud book

Using a new Google API or Service? It might not last long…

I read an interesting analysis on the lifespan of some of the Google service and API that has been cancelled: http://www.theguardian.com/technology/2013/mar/22/google-keep-services-closed

Based on the analysis at the time of the writing, Google service has a mean lifespan of 1,459 days.

An interesting point to ponder, especially if your applications/services depends on one or more Google services.

Screenshot below:
google-service

What ever happened to 1Malaysia Email – Tricubes, Pemandu, anyone??

What ever happened to 1Malaysia email, a project that said to be valued at 5.3 milions (MAVcap funding) ?

Source:

OpenTracker – simplistic, lightweight PHP bittorrent tracker

I just remembered that I used to run a simplistic and lightweight php bittorrent tracker out from my webserver, the tracker slowly attracts users until it used up all the allocated web server bandwidth.

This is a pure tracker with no statistic or control panel, just drop it in the web directory, create the required mysql db connection and schema and you’re good to go. You only need to include the tracker “announce” url in the newly created bittorrent file and start seeding!

Download OpenTracker by WhitSoft Development
Download OpenTracker (Mirror) from Mypapit Personal Blog

Stop Comment spams with IP Blacklist Cloud

Comment spams is the bane of any website operator that rely on real human interaction. Stopping comment spams by hand is a tedious process especially when comment spam attacks are sophisticated and are launched from Botnet. There are several techniques that can be employed to fight comment spams including behavioral analysis and also IP analysis.

In maintaining WordPress and Joomla sites, I myself has analyzed several web logfiles and Cloudflare logs to learn that most comment spam originated from certain ip blocks and countries. Therefore, I decided to completely deny access from those affected ip block through firewall (which keep the comment spam low and saves web server resources!)

ipblc_server

However, recently I found a new service IP Blacklist Cloud which list the top most blacklisted ip address through collaborative effort. Normally I find blacklisting by ip address is tedious and probably harmful to legitimate visitors, however after conforming the ip addresses that I found inside my spam logs, I decided the list is legitimate and decided to firewall-block some of the worst offenders in the list.

IP Blacklist Cloud free WordPress plugins, which I personally does not use due to my policy of keeping my installation lean with minimal (to no plugins!), however I see that there’s no harm giving a shot!