yt-dlp is a command-line tool for which allows a user to download audio/video from thousands of sites. The project is a fork of youtube-dl, which is based on the now inactive youtube-dlc.
yt-dlp can be installed using official releases or via package manager.
Follow the instructions on the NVIDIA websites to install both cuda-12.8.1 and CUDNN 9.8.0
Install Nvidia Linux Driver (not required for WSL2)
Then you must install the latest NVIDIA Linux driver.
At the time of the writing, the latest driver is 570.169 (June 17, 2025)
The NVIDIA Linux driver is not required for Ubuntu 24.04 under WSL2. For that, you need to install Microsoft Windows NVIDIA driver available from NVIDIA App.
About the python wheel file:
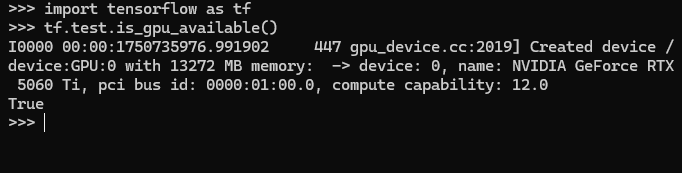
The python wheel file is compiled in Ubuntu 24.04 with llvm and CUDA Toolkit 12.8.1. It supports compute_86, compute_89 and compute_120 cuda devices, which correspond to NVIDIA GPU card with Turing, Ada and Blackwell architectures (or in layman terms: RTX 30, RTX 40 and RTX 50) series.
The python wheel file also comes with AVX, AVX2 and FMA support for both Intel and AMD cpu acceleration.
The Tensorflow version installed is the Tensorflow 2.20dev edition, nightly from :
docker run --gpus all -it --rm nvcr.io/nvidia/tensorflow:xx.xx-tfx-py3
Replace the xx with the actualy version of the tensorflow containers, at the time of the writing it is:
docker run --gpus all -it --rm nvcr.io/nvidia/tensorflow:25.02-tf2-py3
If you want to run it inside the docker, and link your /home directory with the /workspace directory inside the docker image, you can just run :
docker run --gpus all -it --rm -v /home/username:/workspace nvcr.io/nvidia/tensorflow:25.02-tf2-py3
BONUS: How to install Spyder, Jupyterlab and additional Tensorflow/Keras libraries in NVIDIA docker image
I’ve prepared a Dockerfile to rebuild the NVIDIA Tensorflow docker container with GPU acceleration. Download the dockerfile and run “docker build” with this parameter
docker build -t my-nvidia-tf-ds .
Then you can run the container with GPU acceleration
docker run --gpus all -it --rm -v /root:/workspace my-nvidia-tf-ds
You can also expose the port and run Jupyterlab within the docker image. Just follow this step:
docker run --gpus all -p 8888:8888 -it my-nvidia-tf-ds \
jupyter lab --ip=0.0.0.0 --allow-root
Additionally, you can run Spyder in the docker image by forwarding xhost :
xhost +local:docker

docker run -it --gpus all -e DISPLAY=$DISPLAY -v /tmp/.X11-unix:/tmp/.X11-unix \
-v /root:/workspace my-nvidia-tf-ds

spyder
Hopefully this would help you run GPU accelerated Tensorflow with RTX50 series GPU card.
This also works under Microsoft Windows 11 / WSL2 environment too!
If you want to install Tensorflow with RTX 50 series support directly inside your Ubuntu environment, then refer to this post:
Cockpit dashboard is a convenient dashboard for home user or enthusiasts for monitoring several SOHO servers. It supports multiple Linux based operating system, however there are some caveats in installing in Raspberry Pi 3 as it runs on older Bookworm based operating system.
first your need to add bookworm-backports.
echo "deb http://deb.debian.org/debian ${VERSION_CODENAME}-backports main" | sudo tee /etc/apt/sources.list.d/backports.list
DKIM (Domain keys identified Mail) is a scheme for which allows a receiver to verify that the email originated (or authorized) by the domain’s owner via a digital signature.
Having DKIM signature adds credibility to the email messages sent from the origin host/domain, which is crucial for automated emailing system to avoid the messages from being suspected as SPAM email or spoofed email.
I managed to set up DKIM for an academic journal website which I’ve managed. The journal’s runs on Open Journal System web application, the addition of DKIM is crucial to avoid GMail or Microsoft Live from labeling the automated emails sent from the academic journal from being labeled as spam.
At first I found that the DKIM scheme that I’ve setup was running fine and the email messages was verified correctly from my Organizational email domain. However, I’ve noticed a problem when the automated email sent from OJS is not properly verified by Gmail-addressed account (@gmail.com). Upon inspection in the email header, I’ve noticed that the GMail marked the DKIM signature sent from my domain as “bad format”. Example below:
After hours of searching and debugging, including referring to the DKIM NS TXT record for reference, I finally found out that Gmail treat the “g=*” optional parameter as required, and thus I’ve to append “;g=*” to the DKIM TXT record on my domains’ DNS record.