How to set Android *.apk mime-type for Nginx web server

Here’s a simple guide on how to add the correct mime-type for Android APK file for Nginx webserver.

sudo nano /etc/nginx/mime.types

In “mime.types” file, add this line within the “types” block

types {
     ...
     ...
     application/vnd.android.package-archive     apk;
     ...
     ...
}
     

Restart nginx server

sudo service nginx restart

Done!

Generating TLS/SSL Self Signed Certificate for Nginx in Ubuntu LTS

This post concerns on generating self-signed TLS/SSL certificate for Nginx in Ubuntu LTS and assumes that you’ve configured nginx server with a default site.

Step 1: Generate OpenSSL certificate

sudo mkdir /etc/nginx/ssl
sudo openssl req -x509 -nodes -days 365 -newkey rsa:2048 -keyout /etc/nginx/ssl/nginx.key -out /etc/nginx/ssl/nginx.crt
You are about to be asked to enter information that will be incorporated
into your certificate request.
What you are about to enter is what is called a Distinguished Name or a DN.
There are quite a few fields but you can leave some blank
For some fields there will be a default value,
If you enter '.', the field will be left blank.
-----
Country Name (2 letter code) [AU]:US
State or Province Name (full name) [Some-State]:CA
Locality Name (eg, city) []:Palo Alto
Organization Name (eg, company) [Internet Widgits Pty Ltd]:Mypapit LLC
Organizational Unit Name (eg, section) []:Billing
Common Name (e.g. server FQDN or YOUR name) []:Mypapit
Email Address []:mypapit+cert@gmail.com

Step 2: Edit nginx site config

You can edit nginx site config here, replace ‘default’ with your own server config.

sudo nano -c /etc/nginx/sites-enable/default

You will see this server block.

server {
        listen 80;
        listen [::]:80;
        server_name your_domain.com;
        root /var/www/your_domain.com;
        index index.html index.htm;

...
...
}

Add additional line (in italic)

server {
        listen 80;
        listen [::]:80;

    listen 443 ssl;

       server_name your_domain.com;
        root /var/www/your_domain.com;
      index index.html index.htm;

        ssl_certificate /etc/nginx/ssl/nginx.crt;
        ssl_certificate_key /etc/nginx/ssl/nginx.key;
        ssl_protocols TLSv1 TLSv1.1 TLSv1.2;
        ssl_prefer_server_ciphers on;
        add_header Strict-Transport-Security max-age=31536000;


...
...
}

Save file, and restart nginx server

sudo nginx -t
sudo service nginx restart

Test configuration by going to https://your_domain.com.

Done!

Bonus: Add HSTS header and Serve only TLS

HSTS header

Howto install OwnCloud with NGINX in Ubuntu LTS

OwnCloud is a PHP-based Cloud-storage web application for remote storage with file synchronization capabilities.

Step 1
You need to install several packages in order to configure OwnCloud with nginx in your server

sudo apt-get -y install nginx-full php5-fpm php5-sqlite

Step 2: Download Owncloud
Download Owncloud, replace $OWNCLOUD_VER with the latest Owncloud version.

export OWNCLOUD_VER="8.1.0"
cd /var/www/
sudo wget -c https://download.owncloud.org/community/owncloud-${OWNCLOUD-VER}.tar.bz2

Step 3: Extract Owncloud
This will extract owncloud to /var/www/owncloud/

cd /var/www/
tar jxvf owncloud-${OWNCLOUD-VER}.tar.bz2

Step 4: Setup Nginx
You need to setup NGINX

cd /etc/nginx/sites-available
sudo nano -c /etc/nginx/sites-available/owncloud

Step 4a: Setup ‘owncloud’ nginx site

Please change server_name directive to your own ip address or your own domain.
You can also download textfile and upload it directly to your server: http://pastebin.com/2P8h1zNB

#
#/etc/nginx/sites-available/owncloud
# 
server {
  listen 80;
server_name cloud.example.com;
server_name 192.168.1.47;

  # Path to the root of your owncloud installation
  root /var/www/owncloud/;
  # set max upload size
  client_max_body_size 10G;
  fastcgi_buffers 64 4K;

  # Disable gzip to avoid the removal of the ETag header
  gzip off;

  # Uncomment if your server is build with the ngx_pagespeed module
  # This module is currently not supported.
  #pagespeed off;

  rewrite ^/caldav(.*)$ /remote.php/caldav$1 redirect;
  rewrite ^/carddav(.*)$ /remote.php/carddav$1 redirect;
  rewrite ^/webdav(.*)$ /remote.php/webdav$1 redirect;

  index index.php;
  error_page 403 /core/templates/403.php;
  error_page 404 /core/templates/404.php;

  location = /robots.txt {
    allow all;
    log_not_found off;
    access_log off;
    }

  location ~ ^/(?:\.htaccess|data|config|db_structure\.xml|README){
    deny all;
    }

  location / {
   # The following 2 rules are only needed with webfinger
   rewrite ^/.well-known/host-meta /public.php?service=host-meta last;
   rewrite ^/.well-known/host-meta.json /public.php?service=host-meta-json last;

   rewrite ^/.well-known/carddav /remote.php/carddav/ redirect;
   rewrite ^/.well-known/caldav /remote.php/caldav/ redirect;

   rewrite ^(/core/doc/[^\/]+/)$ $1/index.html;

   try_files $uri $uri/ /index.php;
   }

   location ~ \.php(?:$|/) {
   fastcgi_split_path_info ^(.+\.php)(/.+)$;
   include fastcgi_params;
   fastcgi_param SCRIPT_FILENAME $document_root$fastcgi_script_name;
   fastcgi_param PATH_INFO $fastcgi_path_info;
	  fastcgi_pass unix:/var/run/php5-fpm.sock;
   }

   location ~* \.(?:jpg|jpeg|gif|bmp|ico|png|css|js|swf)$ {
       expires 30d;
       # Optional: Don't log access to assets
         access_log off;
   }

  }

Step 4b: Enable ‘owncloud’ settings

cd /etc/nginx/sites-enable/
sudo ln -sf ../sites-available/owncloud .
nginx -t
service nginx restart
service php5-fpm restart

Step 5: Finishing off Owncloud setup

cd /var/www/
mkdir /var/www/owncloud/data
chmod 0770 /var/www/owncloud/data
chmod 0770 /var/www/owncloud/lib/private/
sudo chown -R www-data.www-data /var/www/owncloud

Step 6: Goto the IP-Address or domain name of your owncloud installation

First screen
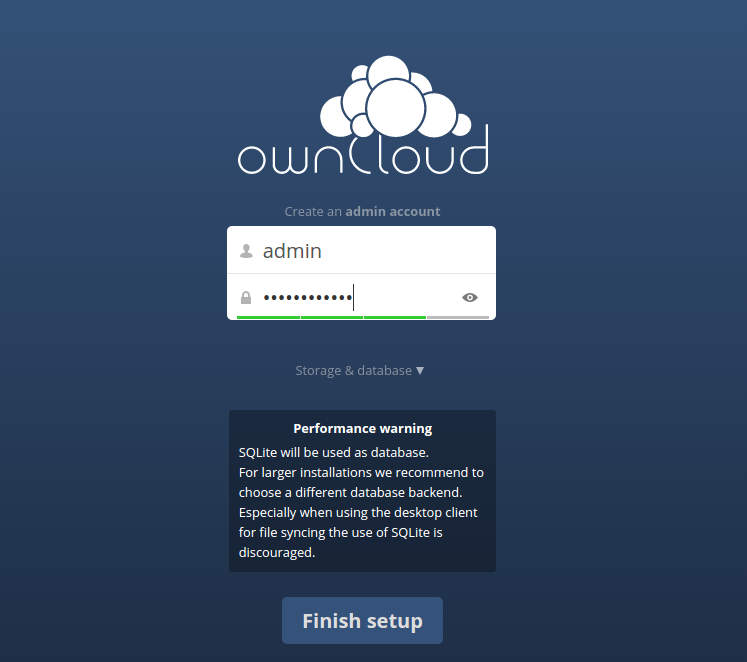
setup-owncloud-first

Welcome to Owncloud
welcome-to-owncloud

Owncloud File Manager and Settings
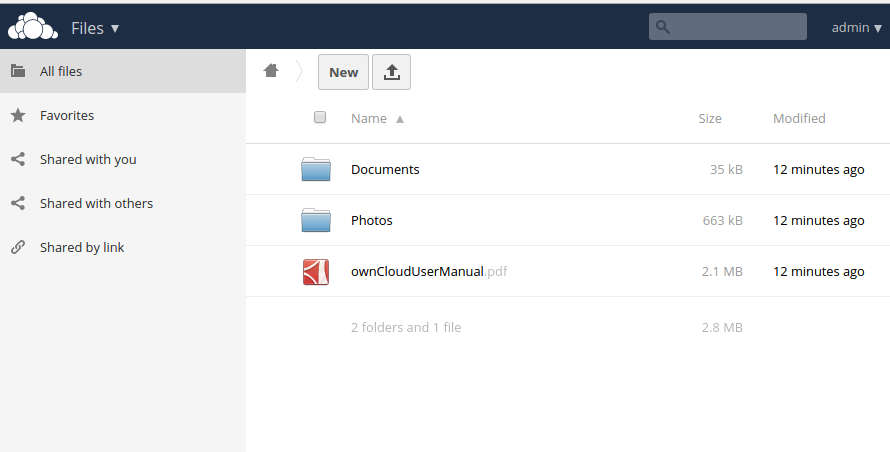
owncloud-filemanager

What’s Next?

After completing installation you may:

  1. Install Android, iPhone or Desktop client to sync all your files
  2. Install TLS/SSL Certificates to secure your Owncloud connection
  3. Install MariaDB/MySQL for efficient synchronization

Warning: Do not enable Pagespeed and SPDY in OwnCloud

OwnCloud servers does not support PageSpeed and SPDY module, so please disable those extension if its exists within your nginx configuration.

Recommended Owncloud book

Install NGINX with PageSpeed using *.deb for Ubuntu LTS (AMD64)

Hello there, I’ve made an easily installable *.deb NGINX package with PageSpeed. The package is made for Ubuntu LTS on AMD64 machine.

Ubuntu 14.04 LTS – nginx 1.8.0 with PageSpeed

  1. nginx-full_1.8.0-1+trusty1-mypapitubuntu4_amd64.deb Full package
  2. nginx-extras_1.8.0-1+trusty1-mypapitubuntu4_amd64.deb Extra package

Ubuntu 14.04 LTS – nginx 1.8.0 with PageSpeed: Other Package

  1. nginx-common_1.8.0-1+trusty1-mypapitubuntu4_all.deb
  2. nginx_1.8.0-1+trusty1-mypapitubuntu4_all.deb
  3. nginx-doc_1.8.0-1+trusty1-mypapitubuntu4_all.deb

Installing nginx-extras or nginx-full is as easy as running this command

sudo dpkg -i nginx-common_1.8.0-1+trusty1-mypapitubuntu4_all.deb
sudo dpkg -i nginx-full_1.8.0-1+trusty1-mypapitubuntu4_amd64.deb
sudo dpkg -i nginx_1.8.0-1+trusty1-mypapitubuntu4_all.deb

Attention : Once installed, the PageSpeed configuration file can be found in “/etc/nginx/conf.d/pagespeed.conf”

Verify Installation
To verify whether nginx with pagespeed has been installed, type

nginx -V

Verify Installation with a preinstalled nginx
If you’ve another version of nginx installed on your system, take note that the nginx-pagespeed from *.deb is installed in “/usr/local/bin”

/usr/local/bin/nginx -V

It will output something like this:

nginx version: nginx/1.8.0
built with OpenSSL 1.0.1f 6 Jan 2014
TLS SNI support enabled
configure arguments: --with-cc-opt='-g -O2 -fPIE -fstack-protector --param=ssp-buffer-size=4 -Wformat -Werror=format-security -D_FORTIFY_SOURCE=2' --with-ld-opt='-Wl,-Bsymbolic-functions -fPIE -pie -Wl,-z,relro -Wl,-z,now' --prefix=/usr/share/nginx --conf-path=/etc/nginx/nginx.conf --http-log-path=/var/log/nginx/access.log --error-log-path=/var/log/nginx/error.log --lock-path=/var/lock/nginx.lock --pid-path=/run/nginx.pid --http-client-body-temp-path=/var/lib/nginx/body --http-fastcgi-temp-path=/var/lib/nginx/fastcgi --http-proxy-temp-path=/var/lib/nginx/proxy --http-scgi-temp-path=/var/lib/nginx/scgi --http-uwsgi-temp-path=/var/lib/nginx/uwsgi --with-debug --with-pcre-jit --with-ipv6 --with-http_ssl_module --with-http_stub_status_module --with-http_realip_module --with-http_auth_request_module --with-http_addition_module --with-http_dav_module --with-http_geoip_module --with-http_gunzip_module --with-http_gzip_static_module --with-http_image_filter_module --with-http_spdy_module --with-http_sub_module --with-http_xslt_module --with-mail --with-mail_ssl_module --add-module=/home/mypapit/source/nginx-1.8.0-1+trusty1/debian/modules/nginx-auth-pam --add-module=/home/mypapit/source/nginx-1.8.0-1+trusty1/debian/modules/nginx-dav-ext-module --add-module=/home/mypapit/source/nginx-1.8.0-1+trusty1/debian/modules/nginx-echo --add-module=/home/mypapit/source/nginx-1.8.0-1+trusty1/debian/modules/nginx-upstream-fair --add-module=/home/mypapit/source/nginx-1.8.0-1+trusty1/debian/modules/ngx_http_substitutions_filter_module --add-module=/home/mypapit/source/nginx-1.8.0-1+trusty1/debian/modules/ngx_pagespeed-release-1.9.32.4-beta

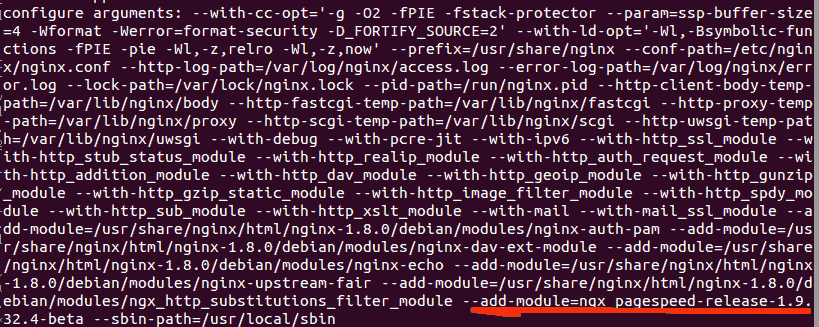
Take note at the bolded text to verify whether pagespeed module has been installed.

Python code: List most popular URL from Apache/NGINX ‘access.log’ file

Found a great Python code snippet for listing the most popular URL from Apache / NGINX ‘access.log’ file. Very practical!

import collections

logfile = open("access.log", "r")

clean_log=[]

for line in logfile:
    try:
        # copy the URLS to an empty list.
        # We get the part between GET and HTTP
        clean_log.append(line[line.index("GET")+4:line.index("HTTP")])
    except:
        pass

counter = collections.Counter(clean_log)

# get the Top 50 most popular URLs
for count in counter.most_common(50):
    print(str(count[1]) + "\t" + str(count[0]))

logfile.close()

The code is very handy if you want to find out the most popular URL or pages in your website, crucial information for optimization, IMHO.

How to test if PageSpeed module is running (on NGINX)

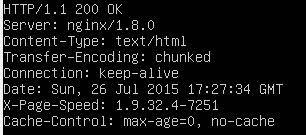
You can run a simple test using curl to verify whether the PageSpeed module is running or not on NGINX.

curl -I -X GET {ip addresss | web address}
curl -I -X GET 192.168.1.47

The output would come out something like this…
xpagespeed-test

You will see “X-Page-Speed” header with its version (in my case its “1.9.32.4-7251“)

If it DOESN’T work

There’s two possibilities:

It doesn’t work! First possibility…
There’s possibilities that you NGINX isn’t configured for PageSpeed, in that case, run:

nginx -V

You should should see a list of nginx compiled modules, if PageSpeed support compiled in, ngx_pagespeed-release-{version} should be listed.

Sample output:
nginx-ensure

If this is the case, then you SHOULD compile nginx PageSpeed module.

It doesn’t work! Second possibility…
Your did not configure PageSpeed module. To configure pagespeed, just create “/etc/nginx/conf.d/pagespeed.conf” file, and fill it with PageSpeed basic config.

#file /etc/nginx/conf.d/pagespeed.conf
        pagespeed on;
        pagespeed FetchWithGzip on;

        pagespeed FileCachePath /run/shm/pagespeed_cache;
        pagespeed RewriteLevel CoreFilters;

Save the file and restart nginx http server.