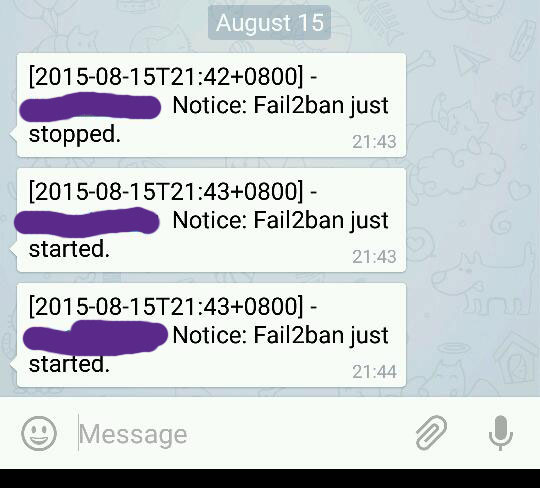
This is a a guide to integrate Telegram messaging service Fail2Ban. With this integration, Fail2Ban notification will be sent through Telegram services.

Requirements
- You need to have Fail2ban installed in your systems.
- Install or compile “telegram-cli”, refer to this guide to compile telegram-cli or install it from *.deb (Ubuntu LTS) AMD64
Setting Up Fail2Ban with Telegram
After installing ‘telegram-cli’ and its requirements, you should proceed to add ‘telegram.conf’ config in /etc/fail2ban/action.d
The content of “telegram.conf“ is as follows.
#
# /etc/fail2ban/action.d/telegram.conf
#
# Author: Toon Ketels
# Modified by: Mohammad Hafiz bin Ismail [mypapit @gmail.com]
#
# $Revision$
#

[Definition]

# Option:  actionstart
# Notes.:  command executed once at the start of Fail2Ban.
# Values:  CMD
#
actionstart = /usr/share/fail2ban/fail2ban-telegram.sh start

# Option:  actionstop
# Notes.:  command executed once at the end of Fail2Ban
# Values:  CMD
#
actionstop = /usr/share/fail2ban/fail2ban-telegram.sh stop

# Option:  actioncheck
# Notes.:  command executed once before each actionban command
# Values:  CMD
#
actioncheck =

# Option:  actionban
# Notes.:  command executed when banning an IP. Take care that the
#          command is executed with Fail2Ban user rights.
# Tags:    [ip]  IP address
#          [failures]  number of failures
#          [time]  unix timestamp of the ban time
# Values:  CMD
#
actionban = /usr/share/fail2ban/fail2ban-telegram.sh ban [ip]

# Option:  actionunban
# Notes.:  command executed when unbanning an IP. Take care that the
#          command is executed with Fail2Ban user rights.
# Tags:    [ip]  IP address
#          [failures]  number of failures
#          [time]  unix timestamp of the ban time
# Values:  CMD
#
actionunban = /usr/share/fail2ban/fail2ban-telegram.sh unban [ip]

[Init]

init = 'Fail2Ban Telegram plugins activated"
Then, you need to create a script file in “/usr/share/fail2ban/fail2ban-telegram.sh“.
#!/bin/bash
# /usr/share/fail2ban/fail2ban-telegram.sh
#
# Sends text messages using telegram api
# to alert server administrator of ip banning.
#
# Requires one argument, one of the following:
#  start
#  stop
#  ban
#  unban
#
# Optional second argument: IP for ban/unban


#replace this with your own telegram contact

to=Telegram_peer_replace_this

# Display usage information
function show_usage {
  echo "Usage: $0 action [ip]"
  echo "Where action is start, stop, ban, unban"
  echo "and ip is optional passed to ban, unban"
  exit
}


# Actually send telegram messages
# Expects the telegram content (body) to be passed
# as argument.
function send_telegram {

  msg="[`date -Iminutes`] - `hostname`:  Notice: $1 "
  echo "$msg" >> /var/log/fail2ban-telegram.log
 (echo "contact_list";sleep 30;echo "msg $to $msg"; echo "safe_quit") | telegram-cli
  exit
}


# Check for script arguments
if [ $# -lt 1 ]
then
  show_usage
fi


# Take action depending on argument
if [ "$1" = 'start' ]
then
  message="Fail2ban just started."
  send_telegram "$message"
elif [ "$1" = 'stop' ]
then
  message="Fail2ban just stopped."
  send_telegram "$message"
elif [ "$1" = 'ban' ]
then
  message=$([ "$2" != '' ] && echo "Fail2ban just banned $2" || echo 'Fail2ban just banned an ip.' )
  send_telegram "$message"
elif [ "$1" = 'unban' ]
then
  message=$([ "$2" != '' ] && echo "Fail2ban just unbanned $2" || echo "Fail2ban just unbanned an ip." )
  send_telegram "$message"
else
  show_usage
fi
After that, you need to ensure that the script is executable, by running.
sudo chmod a+rwx /usr/share/fail2ban/fail2ban-telegram.sh
Then, you need to edit “/etc/fail2ban/jail.conf” file to hook the action plugin with events. In this case, I choose the ssh and sshd events.
sudo nano -c /etc/fail2ban/jail.conf
Then proceed to find the [ssh] and [ssh-ddos] part. Add ‘telegram’ config in the file. Replace the “webmaster@example.com” email address with your email address.
[ssh]

enabled  = true
port     = ssh
filter   = sshd
logpath  = /var/log/auth.log
maxretry = 3
action = mail-whois[name=SSH, dest=webmaster@example.com]
         telegram
Now go to the “ssh-ddos” section, repeat the same step.
[ssh-ddos]

enabled  = true
port     = ssh
filter   = sshd-ddos
logpath  = /var/log/auth.log
maxretry = 4
action = mail-whois[name=SSH, dest=webmaster@example.com]
         telegram
Finishing up: Restart Fail2Ban
Finish up by restarting fail2ban server, and if you done it correctly you will be receiving both telegram messages and email notification regarding fail2ban startup!
sudo service fail2ban restart
Sample Screenshot

Congratulations!!


