Install Tensorflow with RTX 50 series GPU acceleration with Python wheel for Ubuntu 24.04 (and Windows WSL2)

It seems that the Tensorflow acceleration is broken with the latest RTX50 series GPU, especially with the most cost effective RTX5060Ti 16GB card.

This is a guide to install Tensorflow with RTX50 (Blackwell) card GPU acceleration with the python wheel.

First you need to download this python wheel. It is compiled for Ubuntu 24.04 or WSL2 with Ubuntu 24.04.

https://github.com/mypapit/tensorflowRTX50/releases

Then you may need to create a python virtual environment for the wheel.

sudo apt install python3-pip
sudo apt install python3-venv

# replace tensorflow220 with your preferred env name
python3 -m venv tensorflow220

Then you need to activate the environment.

source tensorflow220/bin/activate

Then you may install the tensorflow wheel. To make it easier, you can also install it alongside other requirements.

pip install tensorflow-2.20.0dev0+selfbuild-cp312-cp312-linux_x86_64.whl seaborn pandas matplotlib opencv-python pillow imutils pydot graphviz librosa

Then, you must install CUDA 12.8.1 and CUDNN 9.8.0, please refer to these links:

Follow the instructions on the NVIDIA websites to install both cuda-12.8.1 and CUDNN 9.8.0

Install Nvidia Linux Driver (not required for WSL2)

Then you must install the latest NVIDIA Linux driver.

At the time of the writing, the latest driver is 570.169 (June 17, 2025)

The NVIDIA Linux driver is not required for Ubuntu 24.04 under WSL2. For that, you need to install Microsoft Windows NVIDIA driver available from NVIDIA App.

About the python wheel file:

The python wheel file is compiled in Ubuntu 24.04 with llvm and CUDA Toolkit 12.8.1. It supports compute_86, compute_89 and compute_120 cuda devices, which correspond to NVIDIA GPU card with Turing, Ada and Blackwell architectures (or in layman terms: RTX 30, RTX 40 and RTX 50) series.

The python wheel file also comes with AVX, AVX2 and FMA support for both Intel and AMD cpu acceleration.

The Tensorflow version installed is the Tensorflow 2.20dev edition, nightly from :

https://github.com/tensorflow/tensorflow

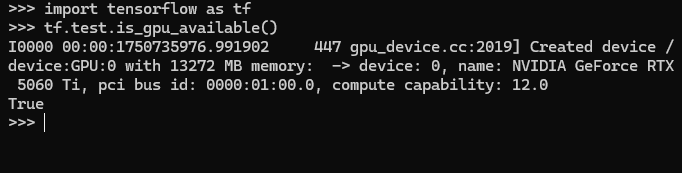
Finally you can test the Tensorflow binaries with the following command.

How to convert Microsoft Office *.docx files to PDF using Linux in command-line

Here’s how to convert Microsoft Office *.docx files to PDF using Linux in Command Line.
This trick can also be used together with other documents files supported by LibreOffice

First make sure you’ve installed the latest version of LibreOffice for use in command line environment.
Assuming the user is ‘example’ and the filename to convert is ‘doc.pdf’.

libreoffice --headless -convert-to pdf --outdir /home/example/ /home/example/doc.docx

The conversion can also be adapted to PHP or Python using their respective shell_exec or subprocess directive.

Share files quickly using python3

You can enable quick file sharing using python3 by activating its built-in internal webserver


python3 -m http.server

The default webserver will listen to port 8000, you can change to any port above 1024 without root privileges by specifying the port number after the command:


python3 -m http.server 9090

Nano command for search and replace

I spend most of my time with headless Ubuntu server or Raspbian (a Debian derivatives distro for Raspberry Pi).

So naturally I use ‘nano’ to edit various configurations files and Python Scripts.

Here are several ‘nano’ shortcuts for your references

Searching

  • CTRL-W : search text string
  • ALT-W : repeat search
  • ALT-B : Backward search

Search and Replace

  • CTRL-\  search and replace

Cut, Copy and Paste

  • CTRL-K : Cut text
  • CTRL-V : Paste text
  • M-^ or ESc-^ : Copy text

Save and Exit

  • CTRL-O : Save file
  • CTRL-X : Exit nano

Indentation (useful for Python)

  • M-} :  Indent Right
  • M-{ : Indent Left (unindent)


That’s all which I can share for today…


Python code: List most popular URL from Apache/NGINX ‘access.log’ file

Found a great Python code snippet for listing the most popular URL from Apache / NGINX ‘access.log’ file. Very practical!

import collections

logfile = open("access.log", "r")

clean_log=[]

for line in logfile:
    try:
        # copy the URLS to an empty list.
        # We get the part between GET and HTTP
        clean_log.append(line[line.index("GET")+4:line.index("HTTP")])
    except:
        pass

counter = collections.Counter(clean_log)

# get the Top 50 most popular URLs
for count in counter.most_common(50):
    print(str(count[1]) + "\t" + str(count[0]))

logfile.close()

The code is very handy if you want to find out the most popular URL or pages in your website, crucial information for optimization, IMHO.

How to Embed Web Browser in Python GTK application using pymozembed

Embedding web browser or a screen for parsing HTML is easy in PyGTK. You only need to import the pymozembed, and add a few lines of code in your pygtk library, and you are set to go.

Here’s a sample PyGTK application that embeds a web-browser as well as a “Back” button for demonstration purpose :

PyGTK + browser Screenshot
PyMozEmbed PyGTK+ Mypapit Demo

[python]
#!/usr/bin/python
#
# demo by mypapit (info@mypapit.net) – Sept 2009
# http://blog.mypapit.net/
#
import pygtk
pygtk.require(‘2.0’)
import gtk
import gtkmozembed

class PyMoz:

def delete_event(self,widget,data=None):
print(“Exit”)
return False

def destroy(self,widget,data=None):
gtk.main_quit()

def button_clicked(self,widget,data):
data.go_back()

def __init__(self):
#init mozembed
self.moz = gtkmozembed.MozEmbed()
#create a Vertical Box Container to whole the browser
#and the “Back Button”
box = gtk.VBox(False,0)

#create a basic GTK+ window
win = gtk.Window()
win.add(box)

#create and connect “Back” button, to add functionality
self.button = gtk.Button(“Back”)
self.button.connect(“clicked”,self.button_clicked,self.moz)

#include both back button and the browser in the vertical box
#and the GTK+ window
box.pack_start(self.button,False,False,0)
box.pack_start(self.moz,True,True,0)

#load the URL
self.moz.load_url(‘http://blog.mypapit.net/’)

#set the window title
title=self.moz.get_title()
win.set_title(“browser demo”)

#show all the stuffs on screen
win.show_all()

#connect the delete_event and destroy event to make sure
#the app quits when the window is closed
win.connect(“delete_event”,self.delete_event)
win.connect(“destroy”,self.destroy)

if __name__ == “__main__”:
PyMoz()
gtk.main()

[/python]

Download demo source code : pymoz.py