Linux Package Manager Cheat Sheet Reference Chart

Linux comes in many flavors or distros, and each distro handles software installation differently from one another. Most GNU/Linux distro uses a package management system to manage software updates/instalation/removal in order to help users administer their Linux systems.

However, many of these package management system has different interface and commands, as such users from Ubuntu (or Debian based) might only be familiar with ‘apt’ or dpkg while Fedora (Red Hat based) users might only familiar with yum and rpm, which may create confusion when users from either distro were to exchange environments.

Luckily, somebody was kind enough to provide these users with Linux Package Manager Cheat Sheet which act as a reference point whenever a user had to switch to another distro which uses package management that are not familiar with them.

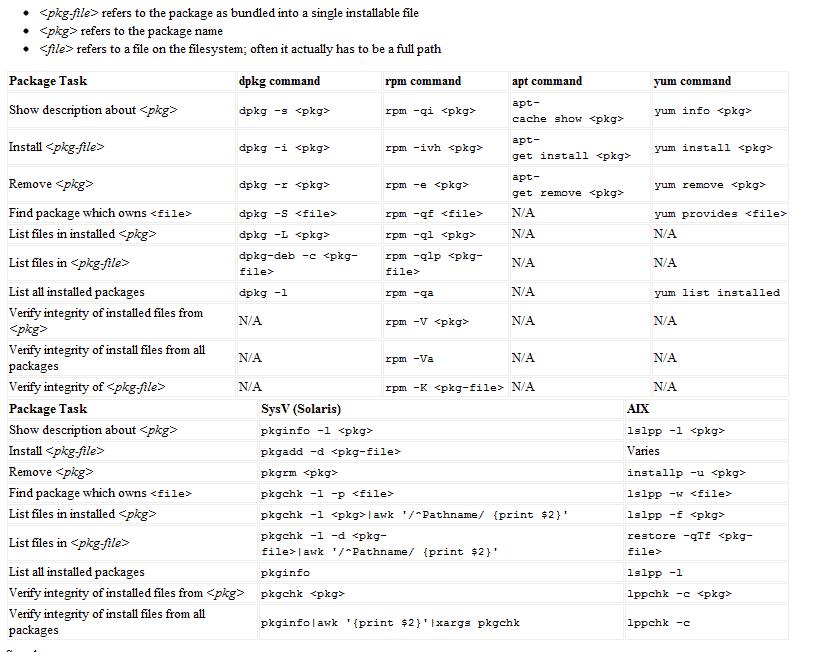
The package management software listed are for: apt,dpkg,yum, rpm, pkg* (slackware based) and AIX-based lsl**.

[ Source ]

How to optimize MySQL tables automatically using cron

Busy websites which has a lot of insert/delete transactions may introduce fragmentation in MySQL tables. Fortunately, users and optimize mysql tables with ‘OPTIMIZE TABLE’ command, but how to execute it automatically?

Here’s how:
The mysql-client package in Ubuntu installation comes with a tool called mysqlcheck which is handy for optimizing table in mysql. This command can be executed from bash and can be executed using cron.

to do that, just run this command.

[bash]
cron -e

#in the crontab file– add this line
59 23 * * * /usr/bin/mysqlcheck -o -v -u <mysql username> -h localhost <database_name> -p <password>
[/bash]

This will tell cron to execute mysqlcheck and optimize mysql table of the specified database exactly on 11:59pm, every day. You can change the setting to suit your need.

How to Hide Apache2 and PHP version without using mod_security in Ubuntu Linux

Although security by obscurity is not the best policy to protect your IS assets, but it is still useful to thwarts simple network scanner or newbie crackers.

Note: This tip is written for Ubuntu Linux, the steps is similar to other GNU/Linux distro, albeit with a slight variant.

Hiding Apache2 version
Edit /etc/apache2/apache2.conf

Add these lines at the end of the file:
ServerSignature Off
ServerTokens Prod

Restart Apache2
[bash]
sudo /etc/init.d/apache2 restart
[/bash]

Hiding PHP version
Edit /etc/php5/apache2/php.ini file

Find these lines, and switch it off:
expose_php = Off
display_errors = Off

Additionally you may disable certain ‘risky’ functions in php by editing the disable_functions line:
disable_functions = phpinfo, system,show_source,

Finally, you may restart Apache2 web server.
[bash]
sudo /etc/init.d/apache2 restart
[/bash]

How to back up files periodically using rsnapshot and NFS in Ubuntu Linux

rsnapshot is a utility that uses rsync to synchronize files between two directories. rsnapshot makes it easier for system admin to backup crucial system data files regularly with minimal bandwidth and effort.

This guide assumes that you’ve already installed nfs-client and rsnapshot via “apt-get” utility in your Debian/Ubuntu Linux system.

Assumptions:
The backup server is connected in the same LAN as the main computer. The backup server is mounted as NFS on the main computer, ip address of the backup server is 192.168.1.100.

Step 1: Create a script to mount backup server filesystem
This is to ensure that the backup server is available at least hourly (or daily, depending on your requirements), save the file as “mount-backup-server.sh”

File content:

#!/usr/bin/bash
# mount-backup-server.sh
mount 192.168.1.100:/backup-point/  /media/backup/

Step 2: Ensure the mount script is run hourly

sudo cp mount-backup-server.sh /etc/cron.hourly
sudo chmod a+x /etc/cron.hourly/mount-backup-server.sh

Continue reading “How to back up files periodically using rsnapshot and NFS in Ubuntu Linux”

How to extract Audio from Youtube Flash Video (FLV) in Ubuntu Linux

First you need youtube-dl tool or ‘cclive’ to download the Youtube .FLV file.

Then, download the Youtube stream.
python youtube-dl http://www.youtube.com/watch?v=lee7a55401e

Alternatively, you can use ‘cclive’ to download the youtube stream.
cclive http://www.youtube.com/watch?v=lee7a55401e

After that, use ffmpeg to extract the audio and encode it to MP3
ffmpeg -i lee7a55401e.flv vn -acodec libmp3lame -ab 128000 -ar 44100 lee7a55401e.mp3

Note: You need to install the restricted codecs in order to extract MP3 audio files.

Thanks Mohammad Bahathir Hashim for the tip!