A Bash script for sending telegram messages in Linux

Would it be nice to be able to receive notification from your Linux system in Telegram?

t_logo

I’ve come up with a rudimentary bash script which lets you integrate the telegram-cli into your own script which is useful for sending messages or notification within automated process to your Telegram account.

The bash script is very useful when you want to send notification to your Telegram account. Example usage: notifying you instantly whenever a backup has been completed or whenever somebody logged into your system or if there’s a brute-force attempt to log into your SSH. Basically anything that you can imagine!

First Step: Install telegram-cli

The first step is to install the telegram-cli client on your Linux system. You may choose to:

  1. Build it on your own – using source code, or
  2. Install telegram-cli from *.deb (Ubuntu LTS only)

IMPORTANT: Please read on how to initialize and sign-in the telegram-cli and key in the required telegram “CODE” in your phone.

Second Step: Copy send-telegram.sh script to /usr/local/bin

You may copy this telegram bash script and chmod it to be executed from command line (up to you).

Download the script at: https://blog.mypapit.net/upload/files/send-telegram.sh.txt

#!/bin/bash
######
###
# telegram-cli bash script r0.1
# change 'to' to your own  Telegram account name
# by =  Mohammad Hafiz bin Ismail  [mypapit@gmail.com]
# url=  https://blog.mypapit.net/
###
######

## Replace 'to' with your account name

to=Replace_this_with_your-Telegram_account_name
##


function show_usage {

 echo "Usage $0 [message]"
 exit
}


if [ $# -lt 1 ]
then
  show_usage
fi


telegram-cli -W -e "msg $to $1"

IMPORTANT: Do not forget to “chmod a+x” the “send-telegram.sh” script.
IMPORTANT: Change the “to” variable in the script to match your own Telegram username.

Third Step: Using the send-telegram.sh script

Using the send-telegram.sh is easy!

Once you’ve logged in and initialized your telegram-cli application. You only need to execute the “send-telegram.sh” to send instant messages to your Telegram account!

Just do this

wget -c https://blog.mypapit.net/upload/files/send-telegram.sh.txt
cp send-telegram.sh.txt /usr/local/bin/send-telegram.sh

Then chmod it, to make it executable,

sudo chmod a+x  /usr/local/bin/send-telegram.sh

IMPORTANT: Change the “to” variable in the send-telegram.sh script to match your own Telegram username.

sudo nano /usr/local/bin/send-telegram.sh

To test your telegram script, just make sure you’ve logged into Telegram and telegram-cli, and have entered the correct activation “CODE”. Read Step 1, if you are unsure.

Then you may try out the send-telegram.sh script

send-telegram.sh "this is my message"

To send telegram message with timestamp type:

send-telegram.sh "`date -I` : this is a message with timestamp"

What should I do next?

Use your imagination! You can integrate this script in crontab, or put it inside another another bash script or conditional operation, or even launch it from a web application, the potential is limitless.

Happy trying!

Securing SSH port and limiting IP address connection with Firewall in Ubuntu

UFW: Securing SSH
UFW or Uncomplicated Firewall is a firewall package in Ubuntu. UFW can be used to secure SSH ports in Ubuntu server.

In order to secure OpenSSH, we must first disable UFW and allow all SSH rule.

sudo ufw disable
sudo ufw delete allow ssh

Then we add IP Address to be allowed to connect to SSH port. In this case I assume that “192.168.1.10” would be allowed to be connected to the server. You can replace IP Address, with any IP Address that you prefer.

sudo ufw allow from 192.168.1.10 to any port ssh

You can also add other IP Address that can be connected to SSH port. In this case, I chose em>”172.25.100.1″.

sudo ufw allow from 172.25.100.1 to any port ssh

Alternatively, you could also specify port number and protocol

sudo ufw allow from 192.168.1.10 to any port 22 proto tcp

Only allow SSH connections from certain subnets

sudo ufw allow from 192.168.1.0/24 to any port 22 proto tcp

Note: Adding firewall rules to only allow SSH connection from certain subnets would increase the server security, further reducing brute-force attack.

Further Reading: Ubuntu Server Administrator Reference

How to send fail2ban notification with Telegram (telegram-cli)

This is a a guide to integrate Telegram messaging service Fail2Ban. With this integration, Fail2Ban notification will be sent through Telegram services.

t_logo

Requirements

  1. You need to have Fail2ban installed in your systems.
  2. Install or compile “telegram-cli”, refer to this guide to compile telegram-cli or install it from *.deb (Ubuntu LTS) AMD64

Setting Up Fail2Ban with Telegram

After installing ‘telegram-cli’ and its requirements, you should proceed to add ‘telegram.conf’ config in /etc/fail2ban/action.d

The content of telegram.conf is as follows.

#
# /etc/fail2ban/action.d/telegram.conf
#
# Author: Toon Ketels
# Modified by: Mohammad Hafiz bin Ismail [mypapit @gmail.com]
#
# $Revision$
#

[Definition]

# Option:  actionstart
# Notes.:  command executed once at the start of Fail2Ban.
# Values:  CMD
#
actionstart = /usr/share/fail2ban/fail2ban-telegram.sh start

# Option:  actionstop
# Notes.:  command executed once at the end of Fail2Ban
# Values:  CMD
#
actionstop = /usr/share/fail2ban/fail2ban-telegram.sh stop

# Option:  actioncheck
# Notes.:  command executed once before each actionban command
# Values:  CMD
#
actioncheck =

# Option:  actionban
# Notes.:  command executed when banning an IP. Take care that the
#          command is executed with Fail2Ban user rights.
# Tags:    [ip]  IP address
#          [failures]  number of failures
#          [time]  unix timestamp of the ban time
# Values:  CMD
#
actionban = /usr/share/fail2ban/fail2ban-telegram.sh ban [ip]

# Option:  actionunban
# Notes.:  command executed when unbanning an IP. Take care that the
#          command is executed with Fail2Ban user rights.
# Tags:    [ip]  IP address
#          [failures]  number of failures
#          [time]  unix timestamp of the ban time
# Values:  CMD
#
actionunban = /usr/share/fail2ban/fail2ban-telegram.sh unban [ip]

[Init]

init = 'Fail2Ban Telegram plugins activated"


Then, you need to create a script file in /usr/share/fail2ban/fail2ban-telegram.sh.

#!/bin/bash
# /usr/share/fail2ban/fail2ban-telegram.sh
#
# Sends text messages using telegram api
# to alert server administrator of ip banning.
#
# Requires one argument, one of the following:
#  start
#  stop
#  ban
#  unban
#
# Optional second argument: IP for ban/unban


#replace this with your own telegram contact

to=Telegram_peer_replace_this

# Display usage information
function show_usage {
  echo "Usage: $0 action [ip]"
  echo "Where action is start, stop, ban, unban"
  echo "and ip is optional passed to ban, unban"
  exit
}


# Actually send telegram messages
# Expects the telegram content (body) to be passed
# as argument.
function send_telegram {

  msg="[`date -Iminutes`] - `hostname`:  Notice: $1 "
  echo "$msg" >> /var/log/fail2ban-telegram.log
 (echo "contact_list";sleep 30;echo "msg $to $msg"; echo "safe_quit") | telegram-cli
  exit
}


# Check for script arguments
if [ $# -lt 1 ]
then
  show_usage
fi


# Take action depending on argument
if [ "$1" = 'start' ]
then
  message="Fail2ban just started."
  send_telegram "$message"
elif [ "$1" = 'stop' ]
then
  message="Fail2ban just stopped."
  send_telegram "$message"
elif [ "$1" = 'ban' ]
then
  message=$([ "$2" != '' ] && echo "Fail2ban just banned $2" || echo 'Fail2ban just banned an ip.' )
  send_telegram "$message"
elif [ "$1" = 'unban' ]
then
  message=$([ "$2" != '' ] && echo "Fail2ban just unbanned $2" || echo "Fail2ban just unbanned an ip." )
  send_telegram "$message"
else
  show_usage
fi

After that, you need to ensure that the script is executable, by running.

sudo chmod a+rwx /usr/share/fail2ban/fail2ban-telegram.sh

Then, you need to edit “/etc/fail2ban/jail.conf” file to hook the action plugin with events. In this case, I choose the ssh and sshd events.

sudo nano -c /etc/fail2ban/jail.conf

Then proceed to find the [ssh] and [ssh-ddos] part. Add ‘telegram’ config in the file. Replace the “webmaster@example.com” email address with your email address.

[ssh]

enabled  = true
port     = ssh
filter   = sshd
logpath  = /var/log/auth.log
maxretry = 3
action = mail-whois[name=SSH, dest=webmaster@example.com]
         telegram

Now go to the “ssh-ddos” section, repeat the same step.

[ssh-ddos]

enabled  = true
port     = ssh
filter   = sshd-ddos
logpath  = /var/log/auth.log
maxretry = 4
action = mail-whois[name=SSH, dest=webmaster@example.com]
         telegram

Finishing up: Restart Fail2Ban

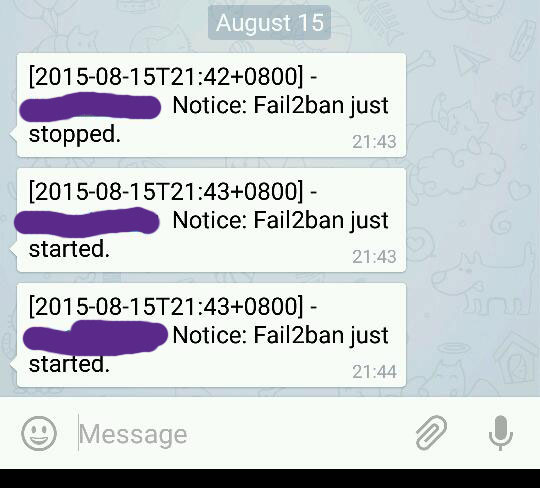
Finish up by restarting fail2ban server, and if you done it correctly you will be receiving both telegram messages and email notification regarding fail2ban startup!

sudo service fail2ban restart

Sample Screenshot

telegram-fail2ban

Congratulations!!

Generating TLS/SSL Self Signed Certificate for Nginx in Ubuntu LTS

This post concerns on generating self-signed TLS/SSL certificate for Nginx in Ubuntu LTS and assumes that you’ve configured nginx server with a default site.

Step 1: Generate OpenSSL certificate

sudo mkdir /etc/nginx/ssl
sudo openssl req -x509 -nodes -days 365 -newkey rsa:2048 -keyout /etc/nginx/ssl/nginx.key -out /etc/nginx/ssl/nginx.crt

You are about to be asked to enter information that will be incorporated
into your certificate request.
What you are about to enter is what is called a Distinguished Name or a DN.
There are quite a few fields but you can leave some blank
For some fields there will be a default value,
If you enter '.', the field will be left blank.
-----
Country Name (2 letter code) [AU]:US
State or Province Name (full name) [Some-State]:CA
Locality Name (eg, city) []:Palo Alto
Organization Name (eg, company) [Internet Widgits Pty Ltd]:Mypapit LLC
Organizational Unit Name (eg, section) []:Billing
Common Name (e.g. server FQDN or YOUR name) []:Mypapit
Email Address []:mypapit+cert@gmail.com

Step 2: Edit nginx site config

You can edit nginx site config here, replace ‘default’ with your own server config.


sudo nano -c /etc/nginx/sites-enable/default

You will see this server block.


server {
        listen 80;
        listen [::]:80;
        server_name your_domain.com;
        root /var/www/your_domain.com;
        index index.html index.htm;

...
...
}

Add additional line (in italic)

server {
        listen 80;
        listen [::]:80;

    listen 443 ssl;

       server_name your_domain.com;
        root /var/www/your_domain.com;
      index index.html index.htm;

        ssl_certificate /etc/nginx/ssl/nginx.crt;
        ssl_certificate_key /etc/nginx/ssl/nginx.key;
        ssl_protocols TLSv1 TLSv1.1 TLSv1.2;
        ssl_prefer_server_ciphers on;
        add_header Strict-Transport-Security max-age=31536000;


...
...
}

Save file, and restart nginx server

sudo nginx -t
sudo service nginx restart

Test configuration by going to https://your_domain.com.

Done!

Bonus: Add HSTS header and Serve only TLS

HSTS header

How to Hide OpenSSH Ubuntu version from Nmap and other scanners

In Ubuntu or Debian, a default OpenSSH server will display OpenSSH version alongside with Ubuntu/Debian distribution banner:

$ telnet repeater.my 172.16.91.20 22 
Trying 172.16.91.20...
Connected to 172.16.91.20.
Escape character is '^]'.
SSH-2.0-OpenSSH_6.6.1p1 Ubuntu-2ubuntu2

You can hide the identifying part of Ubuntu-2ubuntu2 from the server banner by editing /etc/ssh/sshd_config file, and adding “DebianBanner no” either at the end of the file, or just under “Port 22” configuration in “/etc/ssh/sshd_config

#/etc/ssh/sshd_config 
# What ports, IPs and protocols we listen for

Port 22
DebianBanner no

Save and restart OpenSSH server by typing

sudo service ssh restart

Now the response will just be:

Trying 172.16.91.20...
Connected to 172.16.91.20.
Escape character is '^]'.
SSH-2.0-OpenSSH_6.6.1p1

Happy trying!

Further Reading: Ubuntu Server Administrator Reference