
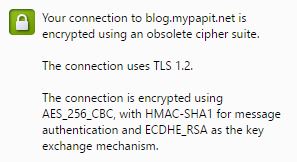
Here is a how to on how to solve the dreaded warning “Your connection is encrypted using obsolete cipher suit” from Google Chrome.
Firstly the warning had nothing to do with using cheap or self-signed TLS/SSL security certificate, but it has to do with cipher suite used on the server part.
So if you are a system administrator, you can edit the site config to include a more modern cipher.
NGINX Server
Using nginx, add the line containing “ssl_cipers” to the site config.
# /etc/nginx/sites-enable/example.conf
server {
 listen 443 ssl;
 root /var/www/example.com/;
 server_name example.com;
   ssl_ciphers 'ECDHE-RSA-AES128-GCM-SHA256:ECDHE-ECDSA-AES128-GCM-SHA256:ECDHE-RSA-AES256-GCM-SHA384:ECDHE-ECDSA-AES256-GCM-SHA384:DHE-RSA-AES128-GCM-SHA256:DHE-DSS-AES128-GCM-SHA256:kEDH+AESGCM:ECDHE-RSA-AES128-SHA256:ECDHE-ECDSA-AES128-SHA256:ECDHE-RSA-AES128-SHA:ECDHE-ECDSA-AES128-SHA:ECDHE-RSA-AES256-SHA384:ECDHE-ECDSA-AES256-SHA384:ECDHE-RSA-AES256-SHA:ECDHE-ECDSA-AES256-SHA:DHE-RSA-AES128-SHA256:DHE-RSA-AES128-SHA:DHE-DSS-AES128-SHA256:DHE-RSA-AES256-SHA256:DHE-DSS-AES256-SHA:DHE-RSA-AES256-SHA';

        ssl_protocols TLSv1.1 TLSv1.2;
        ssl_prefer_server_ciphers on;
...
...
...

}
sudo service nginx restart
Apache HTTP Server
For those who are using Apache HTTP server, you can edit the VirtualHost file from “/etc/apache2/sites-enable/” directory.
<VirtualHost *:443>
    ...
    SSLEngine on
    SSLCertificateFile      /path/to/signed_certificate
    SSLCertificateChainFile /path/to/intermediate_certificate
    SSLCertificateKeyFile   /path/to/private/key
    SSLCACertificateFile    /path/to/all_ca_certs

    # Intermediate configuration, tweak to your needs
    SSLProtocol             all -SSLv2 -SSLv3
    SSLCipherSuite          ECDHE-RSA-AES128-GCM-SHA256:ECDHE-ECDSA-AES128-GCM-SHA256:ECDHE-RSA-AES256-GCM-SHA384:ECDHE-ECDSA-AES256-GCM-SHA384:DHE-RSA-AES128-GCM-SHA256:DHE-DSS-AES128-GCM-SHA256:kEDH+AESGCM:ECDHE-RSA-AES128-SHA256:ECDHE-ECDSA-AES128-SHA256:ECDHE-RSA-AES128-SHA:ECDHE-ECDSA-AES128-SHA:ECDHE-RSA-AES256-SHA384:ECDHE-ECDSA-AES256-SHA384:ECDHE-RSA-AES256-SHA:ECDHE-ECDSA-AES256-SHA:DHE-RSA-AES128-SHA256:DHE-RSA-AES128-SHA:DHE-DSS-AES128-SHA256:DHE-RSA-AES256-SHA256:DHE-DSS-AES256-SHA:DHE-RSA-AES256-SHA
    SSLHonorCipherOrder     on
    SSLCompression          off

    # OCSP Stapling, only in httpd 2.3.3 and later
    SSLUseStapling          on
    SSLStaplingResponderTimeout 5
    SSLStaplingReturnResponderErrors off
    # On Apache 2.4+, SSLStaplingCache must be set *outside* of the VirtualHost
    SSLStaplingCache        shmcb:/var/run/ocsp(128000)

    # Enable this if your want HSTS (recommended)
    # Header add Strict-Transport-Security "max-age=15768000"

    ...
</VirtualHost>
You can restart Apache HTTP server by running
sudo service apache2 restart