Renogy BT-1 telemetry provides useful information for monitoring the condition and performance of a solar photovoltaic system. It can report key values such as PV voltage, current, power generation, battery status, controller temperature, charging activity, and load consumption. These data are important for building dashboards, alerts, databases, and automation systems.
However, developing and testing such a monitoring system normally requires access to real Renogy hardware, including a compatible charge controller and BT-1 Bluetooth module. This can make early development difficult, especially when developers need to reproduce specific conditions such as low battery voltage, peak sunlight, nighttime discharge, or controller inactivity.
My latest open-source project, Renogy BT-1 Telemetry Simulator, removes this hardware requirement.
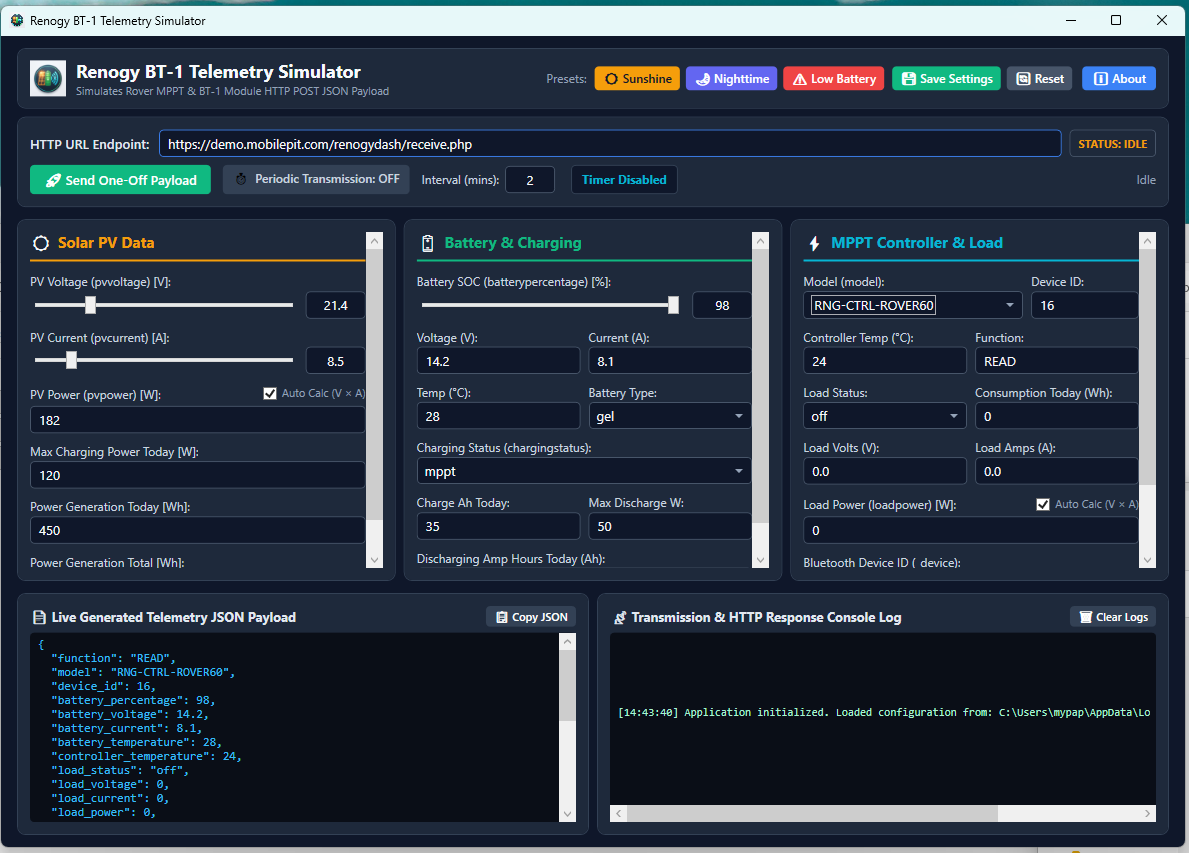
The Renogy BT-1 Telemetry Simulator addresses this problem by generating realistic sample telemetry and sending it as JSON to an HTTP or HTTPS endpoint without requiring physical solar equipment.
The simulator imitates telemetry commonly produced by a Renogy BT-1 module connected to a Renogy Rover MPPT charge controller.
You can manually configure values such as:
- Solar PV voltage, current, power, and generated energy
- Battery percentage, voltage, current, temperature, and battery type
- Controller temperature and charging status
- Load voltage, current, power, and energy consumption
- Controller model, device ID, and BT-1 identifier
The application can also calculate PV and load power automatically.
Renogy BT-1 Telemetry Simulator Use Cases
The simulator is useful for testing the Solar PV under various situations:
- Peak Sunshine
- Nighttime operations
- Low battery conditions
- Heavy loads / light loads
Application Features
- One-off HTTP Post transmission
- Periodic transmission at a configurable interval
- A default two-minute sending interval
- Live JSON payload preview
- Transmission logs with HTTP status, response, errors, and request duration
This is useful for testing local development servers, webhooks, staging systems, database storage, monitoring dashboards, and automated alerts before installing physical solar hardware.
Requirements
The application uses WPF and .NET 8, so it runs on Windows 10 or Windows 11. Developers can build it using Visual Studio 2022 or the standard dotnet command-line tools.
The current HTTP client accepts self-signed HTTPS certificates for local testing. This behaviour should not be treated as secure certificate validation for production systems.
Download the Source Code
Renogy BT-1 Telemetry Simulator is available on GitHub:
github.com/mypapit/renogybt1simulator
The project is released under the GNU General Public License version 3, allowing users to study, modify, and redistribute the source code according to the GPL terms.
This project is an independent simulator and is not an official Renogy product.