LILO Linux Bootloader project is ending

LILO – the venerable Linux Bootloader is ending its development. The news has been announced at its project’s page.

lilo-bootloader

I’ve used LILO since the very first time I’m acquainted with GNU/Linux operating system, back in 2002. LILO simplicity makes it easy to install and reinstall the bootloader using standard computer BIOS at the time.

However, guess time has changed, with multitude of the server environment which linux computer may have been deployed, LILO probably has caught up with its limitation.

Still, I could still see LILO can be useful within embedded computing environment.

Download Wordlist for dictionary attack

Crackstation wordlist is one of the most (if not the most) comprehensive wordlist which can be used for the purpose of dictionary -attack on passwords.

The wordlist comes in two flavors:

  1. Full wordlist (GZIP-compressed (level 9). 4.2 GiB compressed. 15 GiB uncompressed)
  2. Human-password only wordlist (GZIP-compressed. 247 MiB compressed. 684 MiB uncompressed)

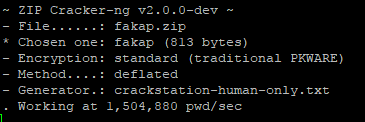
Personally, I’ve already downloaded the full wordlist via torrent, and tested it against few PDF files (using pdfcrack) and UNIX password cracking (using John), all my test cases were successful. In my opinion, the wordlist is comprehensive for my need.

Since it looked like it took a significant effort to compile this wordlist, I rather advocate those who are interested to donate/buy the wordlist from: https://crackstation.net/buy-crackstation-wordlist-password-cracking-dictionary.htm

Cracking PDF file with PDFCrack in Linux

I’ve come across an PDF which was sent to my email from an automated banking system. Unfortunately, the PDF file is encrypted and I’ve no way of knowing the password (or actually I’ve forgotten the password).

Fortunately, my Ubuntu box comes with application which allows me to crack the PDF file within a reasonable time.

Using ‘pdfcrack’ to crack PDF file

You need to install pdfcrack to crack pdf file. In Ubuntu/Debian system, you simply need to run

sudo apt-get -y install pdfcrack

Then for actual cracking, you can run

pdfcrack -n5 -m10 encrypted.pdf

Where -n [minimum length] to brute-force, and -m [maximum length] to brute-force.

pdfcrack can also accept a file input containing list of words (dictionary attack). For dictionary-attack just run

pdfcrack --wordlist=dictionary.txt encrypted.pdf

Securing SSH port and limiting IP address connection with Firewall in Ubuntu

UFW: Securing SSH
UFW or Uncomplicated Firewall is a firewall package in Ubuntu. UFW can be used to secure SSH ports in Ubuntu server.

In order to secure OpenSSH, we must first disable UFW and allow all SSH rule.

sudo ufw disable
sudo ufw delete allow ssh

Then we add IP Address to be allowed to connect to SSH port. In this case I assume that “192.168.1.10” would be allowed to be connected to the server. You can replace IP Address, with any IP Address that you prefer.

sudo ufw allow from 192.168.1.10 to any port ssh

You can also add other IP Address that can be connected to SSH port. In this case, I chose em>”172.25.100.1″.

sudo ufw allow from 172.25.100.1 to any port ssh

Alternatively, you could also specify port number and protocol

sudo ufw allow from 192.168.1.10 to any port 22 proto tcp

Only allow SSH connections from certain subnets

sudo ufw allow from 192.168.1.0/24 to any port 22 proto tcp

Note: Adding firewall rules to only allow SSH connection from certain subnets would increase the server security, further reducing brute-force attack.

Further Reading: Ubuntu Server Administrator Reference

Solving “Connection is encrypted using obsolete cipher suite” warning from Chrome

Here is a how to on how to solve the dreaded warning “Your connection is encrypted using obsolete cipher suit” from Google Chrome.

Firstly the warning had nothing to do with using cheap or self-signed TLS/SSL security certificate, but it has to do with cipher suite used on the server part.

obsolete-cipher-suite

So if you are a system administrator, you can edit the site config to include a more modern cipher.

NGINX Server

Using nginx, add the line containing “ssl_cipers” to the site config.

# /etc/nginx/sites-enable/example.conf 
server {
 listen 443 ssl;
 root /var/www/example.com/;
 server_name example.com;
   ssl_ciphers 'ECDHE-RSA-AES128-GCM-SHA256:ECDHE-ECDSA-AES128-GCM-SHA256:ECDHE-RSA-AES256-GCM-SHA384:ECDHE-ECDSA-AES256-GCM-SHA384:DHE-RSA-AES128-GCM-SHA256:DHE-DSS-AES128-GCM-SHA256:kEDH+AESGCM:ECDHE-RSA-AES128-SHA256:ECDHE-ECDSA-AES128-SHA256:ECDHE-RSA-AES128-SHA:ECDHE-ECDSA-AES128-SHA:ECDHE-RSA-AES256-SHA384:ECDHE-ECDSA-AES256-SHA384:ECDHE-RSA-AES256-SHA:ECDHE-ECDSA-AES256-SHA:DHE-RSA-AES128-SHA256:DHE-RSA-AES128-SHA:DHE-DSS-AES128-SHA256:DHE-RSA-AES256-SHA256:DHE-DSS-AES256-SHA:DHE-RSA-AES256-SHA';

        ssl_protocols TLSv1.1 TLSv1.2;
        ssl_prefer_server_ciphers on;
...
...
...

}

sudo service nginx restart

Apache HTTP Server

For those who are using Apache HTTP server, you can edit the VirtualHost file from “/etc/apache2/sites-enable/” directory.

<VirtualHost *:443>
    ...
    SSLEngine on
    SSLCertificateFile      /path/to/signed_certificate
    SSLCertificateChainFile /path/to/intermediate_certificate
    SSLCertificateKeyFile   /path/to/private/key
    SSLCACertificateFile    /path/to/all_ca_certs

    # Intermediate configuration, tweak to your needs
    SSLProtocol             all -SSLv2 -SSLv3
    SSLCipherSuite          ECDHE-RSA-AES128-GCM-SHA256:ECDHE-ECDSA-AES128-GCM-SHA256:ECDHE-RSA-AES256-GCM-SHA384:ECDHE-ECDSA-AES256-GCM-SHA384:DHE-RSA-AES128-GCM-SHA256:DHE-DSS-AES128-GCM-SHA256:kEDH+AESGCM:ECDHE-RSA-AES128-SHA256:ECDHE-ECDSA-AES128-SHA256:ECDHE-RSA-AES128-SHA:ECDHE-ECDSA-AES128-SHA:ECDHE-RSA-AES256-SHA384:ECDHE-ECDSA-AES256-SHA384:ECDHE-RSA-AES256-SHA:ECDHE-ECDSA-AES256-SHA:DHE-RSA-AES128-SHA256:DHE-RSA-AES128-SHA:DHE-DSS-AES128-SHA256:DHE-RSA-AES256-SHA256:DHE-DSS-AES256-SHA:DHE-RSA-AES256-SHA
    SSLHonorCipherOrder     on
    SSLCompression          off

    # OCSP Stapling, only in httpd 2.3.3 and later
    SSLUseStapling          on
    SSLStaplingResponderTimeout 5
    SSLStaplingReturnResponderErrors off
    # On Apache 2.4+, SSLStaplingCache must be set *outside* of the VirtualHost
    SSLStaplingCache        shmcb:/var/run/ocsp(128000)
 
    # Enable this if your want HSTS (recommended)
    # Header add Strict-Transport-Security "max-age=15768000"
 
    ...
</VirtualHost>

You can restart Apache HTTP server by running

sudo service apache2 restart