nmap scanning for ip camera in the network

Here’s an nmap snippet for scanning for hidden cctv / ip camera in the network

nmap -sV --script=http-enum,http-title,rtsp-url-brute -p 80,443,554,8000 <ip range>

Or you can write as :

sudo nmap -sV --script=http-enum,http-title,rtsp-url-brute -p 80,443,554,8000 192.168.0.0/24

Make sure you have permission to scan on the network!

Getting Rid of /.well-known/traffic-advice 404 errors in nginx web server

It seems Google have implemented private prefetch proxy in Chrome for Android.

The upside of this private prefetch proxy is improved browsing experience for mobile users by reducing waiting time for web pages to load.

The downside is, as web server administrators – you might find a lot of 404 status in your web logs.

To solve this, you could either :

  • Write directive to ignore 404 logs for “traffic-advice”
  • Create “/.well-known/traffic-advice file for each domain and set the file to be served with “application/trafficadvice+json” MIME type [source]

Solution

Luckily, TechTitBits have come up with a convenient solution which only involves adding a few lines in configuration files to enable Chrome for Android prefetched proxy in nginx.

location = /.well-known/traffic-advice {
    types { }
    default_type "application/trafficadvice+json; charset=utf-8";
    return 200 '[{ "user_agent": "prefetch-proxy", "fraction": 1 }]';
}

With this solution, you would only need to add the location block within the server { } context in the site configurations.

Thank you for the tip: Traffic Advice configuration for Nginx

Get Free PHP and MySQL Hosting with InfinityFree

For those who are seeking free web hosting to test their PHP / MySQL application can look into InfinityFree.net service which has interesting offers:

  • 99% uptime
  • No advertisement
  • PHP 7.0
  • MySQL 5.6
  • Includes FTP account access (rare !!)
  • Up to 10 Email Account
  • Apache 2.4 with .htaccess
  • 400 MySQL database
  • User can add their own domain
  • Free DNS service (including custom CNAME and MX record)
  • Unlimited Disk space and Bandwidth
  • Support Cloudflare CDN
  • Support SSL Certificate

The main advantages which entice me to InfinityFree are their support for SSL Certificate, 99% uptime guarantees and support for adding own domain name with their own free DNS.

The support for SSL certificate means that you can host Telegram Bot, Google Map web application and web app which utilizes OAuth API!

A rare sight for a completely free web hosting provider.

The only downside for InfinityFree is the free hosting only support up to 50,000 hits on the web server, which is fair by me as the free hosting could provide a good playground for Students and Web App Enthusiast to experiment with their code.


Solving “Connection is encrypted using obsolete cipher suite” warning from Chrome

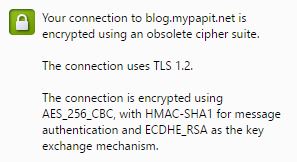
Here is a how to on how to solve the dreaded warning “Your connection is encrypted using obsolete cipher suit” from Google Chrome.

Firstly the warning had nothing to do with using cheap or self-signed TLS/SSL security certificate, but it has to do with cipher suite used on the server part.

obsolete-cipher-suite

So if you are a system administrator, you can edit the site config to include a more modern cipher.

NGINX Server

Using nginx, add the line containing “ssl_cipers” to the site config.

# /etc/nginx/sites-enable/example.conf 
server {
 listen 443 ssl;
 root /var/www/example.com/;
 server_name example.com;
   ssl_ciphers 'ECDHE-RSA-AES128-GCM-SHA256:ECDHE-ECDSA-AES128-GCM-SHA256:ECDHE-RSA-AES256-GCM-SHA384:ECDHE-ECDSA-AES256-GCM-SHA384:DHE-RSA-AES128-GCM-SHA256:DHE-DSS-AES128-GCM-SHA256:kEDH+AESGCM:ECDHE-RSA-AES128-SHA256:ECDHE-ECDSA-AES128-SHA256:ECDHE-RSA-AES128-SHA:ECDHE-ECDSA-AES128-SHA:ECDHE-RSA-AES256-SHA384:ECDHE-ECDSA-AES256-SHA384:ECDHE-RSA-AES256-SHA:ECDHE-ECDSA-AES256-SHA:DHE-RSA-AES128-SHA256:DHE-RSA-AES128-SHA:DHE-DSS-AES128-SHA256:DHE-RSA-AES256-SHA256:DHE-DSS-AES256-SHA:DHE-RSA-AES256-SHA';

        ssl_protocols TLSv1.1 TLSv1.2;
        ssl_prefer_server_ciphers on;
...
...
...

}

sudo service nginx restart

Apache HTTP Server

For those who are using Apache HTTP server, you can edit the VirtualHost file from “/etc/apache2/sites-enable/” directory.

<VirtualHost *:443>
    ...
    SSLEngine on
    SSLCertificateFile      /path/to/signed_certificate
    SSLCertificateChainFile /path/to/intermediate_certificate
    SSLCertificateKeyFile   /path/to/private/key
    SSLCACertificateFile    /path/to/all_ca_certs

    # Intermediate configuration, tweak to your needs
    SSLProtocol             all -SSLv2 -SSLv3
    SSLCipherSuite          ECDHE-RSA-AES128-GCM-SHA256:ECDHE-ECDSA-AES128-GCM-SHA256:ECDHE-RSA-AES256-GCM-SHA384:ECDHE-ECDSA-AES256-GCM-SHA384:DHE-RSA-AES128-GCM-SHA256:DHE-DSS-AES128-GCM-SHA256:kEDH+AESGCM:ECDHE-RSA-AES128-SHA256:ECDHE-ECDSA-AES128-SHA256:ECDHE-RSA-AES128-SHA:ECDHE-ECDSA-AES128-SHA:ECDHE-RSA-AES256-SHA384:ECDHE-ECDSA-AES256-SHA384:ECDHE-RSA-AES256-SHA:ECDHE-ECDSA-AES256-SHA:DHE-RSA-AES128-SHA256:DHE-RSA-AES128-SHA:DHE-DSS-AES128-SHA256:DHE-RSA-AES256-SHA256:DHE-DSS-AES256-SHA:DHE-RSA-AES256-SHA
    SSLHonorCipherOrder     on
    SSLCompression          off

    # OCSP Stapling, only in httpd 2.3.3 and later
    SSLUseStapling          on
    SSLStaplingResponderTimeout 5
    SSLStaplingReturnResponderErrors off
    # On Apache 2.4+, SSLStaplingCache must be set *outside* of the VirtualHost
    SSLStaplingCache        shmcb:/var/run/ocsp(128000)
 
    # Enable this if your want HSTS (recommended)
    # Header add Strict-Transport-Security "max-age=15768000"
 
    ...
</VirtualHost>

You can restart Apache HTTP server by running

sudo service apache2 restart

How to send fail2ban notification with Telegram (telegram-cli)

This is a a guide to integrate Telegram messaging service Fail2Ban. With this integration, Fail2Ban notification will be sent through Telegram services.

t_logo

Requirements

  1. You need to have Fail2ban installed in your systems.
  2. Install or compile “telegram-cli”, refer to this guide to compile telegram-cli or install it from *.deb (Ubuntu LTS) AMD64

Setting Up Fail2Ban with Telegram

After installing ‘telegram-cli’ and its requirements, you should proceed to add ‘telegram.conf’ config in /etc/fail2ban/action.d

The content of telegram.conf is as follows.

#
# /etc/fail2ban/action.d/telegram.conf
#
# Author: Toon Ketels
# Modified by: Mohammad Hafiz bin Ismail [mypapit @gmail.com]
#
# $Revision$
#

[Definition]

# Option:  actionstart
# Notes.:  command executed once at the start of Fail2Ban.
# Values:  CMD
#
actionstart = /usr/share/fail2ban/fail2ban-telegram.sh start

# Option:  actionstop
# Notes.:  command executed once at the end of Fail2Ban
# Values:  CMD
#
actionstop = /usr/share/fail2ban/fail2ban-telegram.sh stop

# Option:  actioncheck
# Notes.:  command executed once before each actionban command
# Values:  CMD
#
actioncheck =

# Option:  actionban
# Notes.:  command executed when banning an IP. Take care that the
#          command is executed with Fail2Ban user rights.
# Tags:    [ip]  IP address
#          [failures]  number of failures
#          [time]  unix timestamp of the ban time
# Values:  CMD
#
actionban = /usr/share/fail2ban/fail2ban-telegram.sh ban [ip]

# Option:  actionunban
# Notes.:  command executed when unbanning an IP. Take care that the
#          command is executed with Fail2Ban user rights.
# Tags:    [ip]  IP address
#          [failures]  number of failures
#          [time]  unix timestamp of the ban time
# Values:  CMD
#
actionunban = /usr/share/fail2ban/fail2ban-telegram.sh unban [ip]

[Init]

init = 'Fail2Ban Telegram plugins activated"


Then, you need to create a script file in /usr/share/fail2ban/fail2ban-telegram.sh.

#!/bin/bash
# /usr/share/fail2ban/fail2ban-telegram.sh
#
# Sends text messages using telegram api
# to alert server administrator of ip banning.
#
# Requires one argument, one of the following:
#  start
#  stop
#  ban
#  unban
#
# Optional second argument: IP for ban/unban


#replace this with your own telegram contact

to=Telegram_peer_replace_this

# Display usage information
function show_usage {
  echo "Usage: $0 action [ip]"
  echo "Where action is start, stop, ban, unban"
  echo "and ip is optional passed to ban, unban"
  exit
}


# Actually send telegram messages
# Expects the telegram content (body) to be passed
# as argument.
function send_telegram {

  msg="[`date -Iminutes`] - `hostname`:  Notice: $1 "
  echo "$msg" >> /var/log/fail2ban-telegram.log
 (echo "contact_list";sleep 30;echo "msg $to $msg"; echo "safe_quit") | telegram-cli
  exit
}


# Check for script arguments
if [ $# -lt 1 ]
then
  show_usage
fi


# Take action depending on argument
if [ "$1" = 'start' ]
then
  message="Fail2ban just started."
  send_telegram "$message"
elif [ "$1" = 'stop' ]
then
  message="Fail2ban just stopped."
  send_telegram "$message"
elif [ "$1" = 'ban' ]
then
  message=$([ "$2" != '' ] && echo "Fail2ban just banned $2" || echo 'Fail2ban just banned an ip.' )
  send_telegram "$message"
elif [ "$1" = 'unban' ]
then
  message=$([ "$2" != '' ] && echo "Fail2ban just unbanned $2" || echo "Fail2ban just unbanned an ip." )
  send_telegram "$message"
else
  show_usage
fi

After that, you need to ensure that the script is executable, by running.

sudo chmod a+rwx /usr/share/fail2ban/fail2ban-telegram.sh

Then, you need to edit “/etc/fail2ban/jail.conf” file to hook the action plugin with events. In this case, I choose the ssh and sshd events.

sudo nano -c /etc/fail2ban/jail.conf

Then proceed to find the [ssh] and [ssh-ddos] part. Add ‘telegram’ config in the file. Replace the “webmaster@example.com” email address with your email address.

[ssh]

enabled  = true
port     = ssh
filter   = sshd
logpath  = /var/log/auth.log
maxretry = 3
action = mail-whois[name=SSH, dest=webmaster@example.com]
         telegram

Now go to the “ssh-ddos” section, repeat the same step.

[ssh-ddos]

enabled  = true
port     = ssh
filter   = sshd-ddos
logpath  = /var/log/auth.log
maxretry = 4
action = mail-whois[name=SSH, dest=webmaster@example.com]
         telegram

Finishing up: Restart Fail2Ban

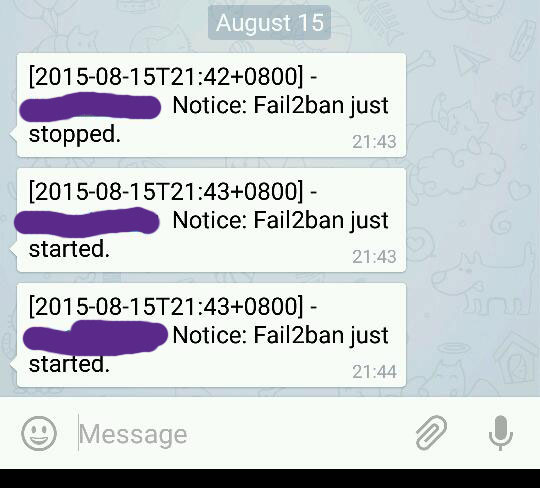
Finish up by restarting fail2ban server, and if you done it correctly you will be receiving both telegram messages and email notification regarding fail2ban startup!

sudo service fail2ban restart

Sample Screenshot
telegram-fail2ban

Congratulations!!

Generating TLS/SSL Self Signed Certificate for Nginx in Ubuntu LTS

This post concerns on generating self-signed TLS/SSL certificate for Nginx in Ubuntu LTS and assumes that you’ve configured nginx server with a default site.

Step 1: Generate OpenSSL certificate

sudo mkdir /etc/nginx/ssl
sudo openssl req -x509 -nodes -days 365 -newkey rsa:2048 -keyout /etc/nginx/ssl/nginx.key -out /etc/nginx/ssl/nginx.crt

You are about to be asked to enter information that will be incorporated
into your certificate request.
What you are about to enter is what is called a Distinguished Name or a DN.
There are quite a few fields but you can leave some blank
For some fields there will be a default value,
If you enter '.', the field will be left blank.
-----
Country Name (2 letter code) [AU]:US
State or Province Name (full name) [Some-State]:CA
Locality Name (eg, city) []:Palo Alto
Organization Name (eg, company) [Internet Widgits Pty Ltd]:Mypapit LLC
Organizational Unit Name (eg, section) []:Billing
Common Name (e.g. server FQDN or YOUR name) []:Mypapit
Email Address []:mypapit+cert@gmail.com

Step 2: Edit nginx site config

You can edit nginx site config here, replace ‘default’ with your own server config.


sudo nano -c /etc/nginx/sites-enable/default

You will see this server block.


server {
        listen 80;
        listen [::]:80;
        server_name your_domain.com;
        root /var/www/your_domain.com;
        index index.html index.htm;

...
...
}

Add additional line (in italic)

server {
        listen 80;
        listen [::]:80;

    listen 443 ssl;

       server_name your_domain.com;
        root /var/www/your_domain.com;
      index index.html index.htm;

        ssl_certificate /etc/nginx/ssl/nginx.crt;
        ssl_certificate_key /etc/nginx/ssl/nginx.key;
        ssl_protocols TLSv1 TLSv1.1 TLSv1.2;
        ssl_prefer_server_ciphers on;
        add_header Strict-Transport-Security max-age=31536000;


...
...
}

Save file, and restart nginx server

sudo nginx -t
sudo service nginx restart

Test configuration by going to https://your_domain.com.

Done!

Bonus: Add HSTS header and Serve only TLS

HSTS header